Welcome to my Windows Hardening Guide! Last post I covered an overview of the concept of Defense-in-Depth, and much of that will be applied here, but not completely comprehensively. I won’t cover many of the Physical controls and even some Administrative controls. Let’s assume you already have some of those in place. Here we will mainly focus on Technical controls and the many layers we can implement to reduce the attack surface of a Windows machine.
For this guide I will be using a Windows 11 Enterprise machine. You can feel free to follow along using any supported Windows release. Try not to go further before any recent Windows 10 release as this would obviously be counter-intuitive. Working with a release that is still being supported, meaning receiving active updates is crucial. Now that we have the requirements laid down, let’s move forward!
Many of this is not Windows 11 specific and can be applied to all versions of Windows, including Windows 11, Windows 10 and Windows Server releases. I specifically chose the most recent Windows 11 Enterprise release as it would help this post age the best and keep it most relevant, especially now that Windows 10 is slowly reaching end-of-support in October 2025.
Just a side note – this guide will be mainly focused on hardening the machine itself and won’t cover an Active Directory environment. This won’t be going into managing Active Directory, GPOs, OUs, Domain Controllers, DNS, etc. This is another topic in it of itself and can take a whole post or two to cover.
I’ll be including a checklist here that will focus on an overview of objectives that should be addressed. This provides a solid focus on the main areas that will vastly reduce your attack surface. Here are the categories that I will focus on (in no particular order):
- Firewall Setup
- Account Management
- Anti-Virus (AV) and other Anti-Malware Solutions
- Software Updates and Patch Management
- Data Encryption and File Protection
- Logging and Monitoring
- Configuring Privacy Settings
- General Configurations
Firewall Setup
There are many ways to tackle this subject. Here I will focus on software firewalls since we are focusing on the OS side of things. However, I would highly recommend having a hardware firewall on your network. This goes back to the concept of the “Swiss Cheese Model” where you layer your defensive tactics. Having a heavy fortified machine is great, but if the rest of your network (like the dreaded IoT devices) aren’t behind a firewall, you’re just asking for trouble. Now that we touched upon that lets continue with our firewall choices for Windows.
You can used the firewall included with Windows Defender, but I’m not too particularly fond of it. I think there are better 3rd party solutions such as simplewall and Portmaster. So in this guide I will be disabling Windows Firewall and using Portmaster. There is nothing wrong with simplewall and I believe it is a fantastic piece of software. Part of the reason I will be using Portmaster is just for how visually appealing it is and how it can represent your internet traffic. Again, this is just preference and many for the sake of this guide. I won’t dive deep into this as firewall configuration can be a topic on its own, but I’ll breeze through a basic setup. If there is enough interest for me to do a dedicated post for Portmaster, I might do so in the future.
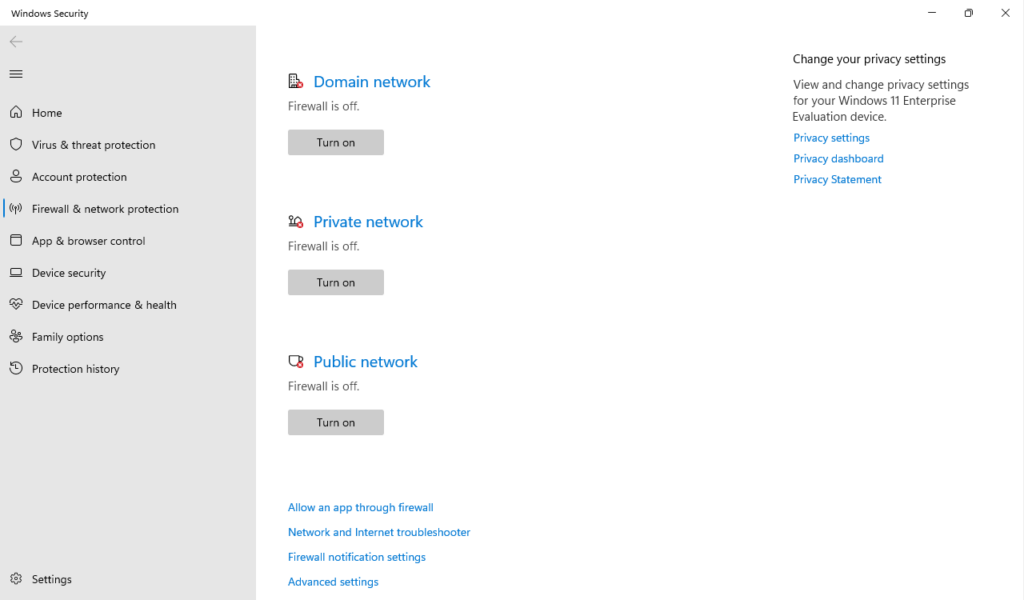
First let’s disable Windows Firewall, by searching “Firewall” from the Start Menu and selecting “Firewall & network protection” under System settings. Or by selecting “Settings” from the Start Menu > Privacy & security > Windows security > Firewall & network protection. Or my personal favorite, pressing window + R key to open the Run dialog and typing “firewall.cpl” and hitting Enter. Either way you do it, your “Firewall & network protection” settings should look like this:
Here’s a quick look at the basic Portmaster setup and traffic overview:
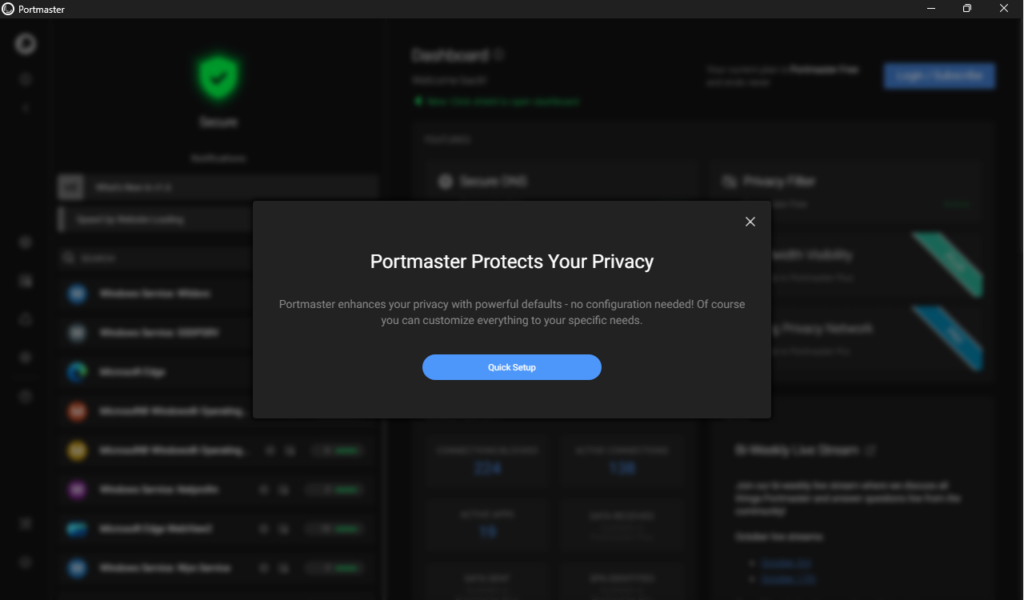
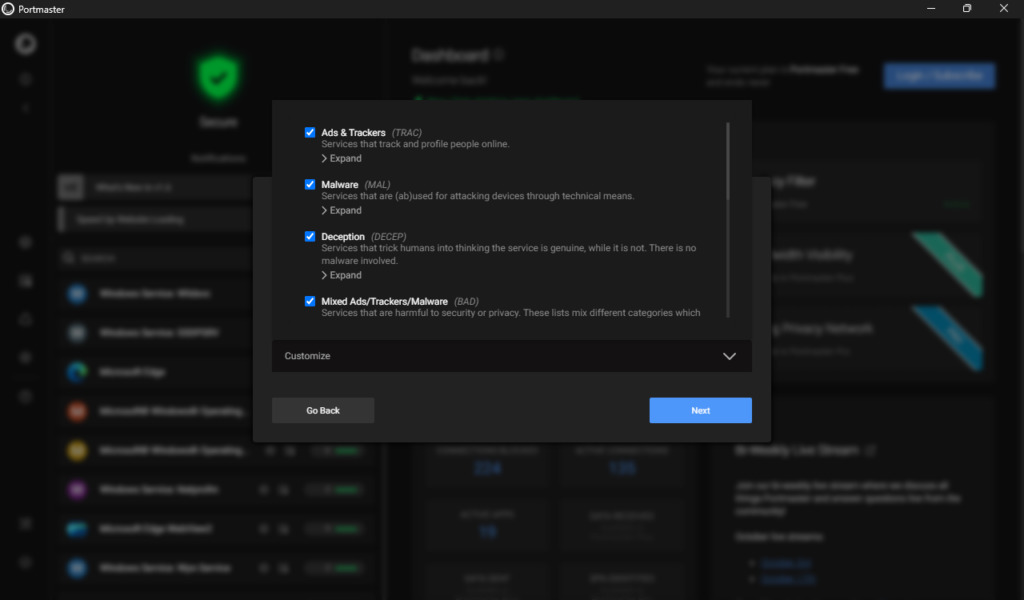
At this step we can select what type of protection we are after. These are called “Filter Lists” and can be modified at anytime. The only selection I added here was the “Deception” filter.
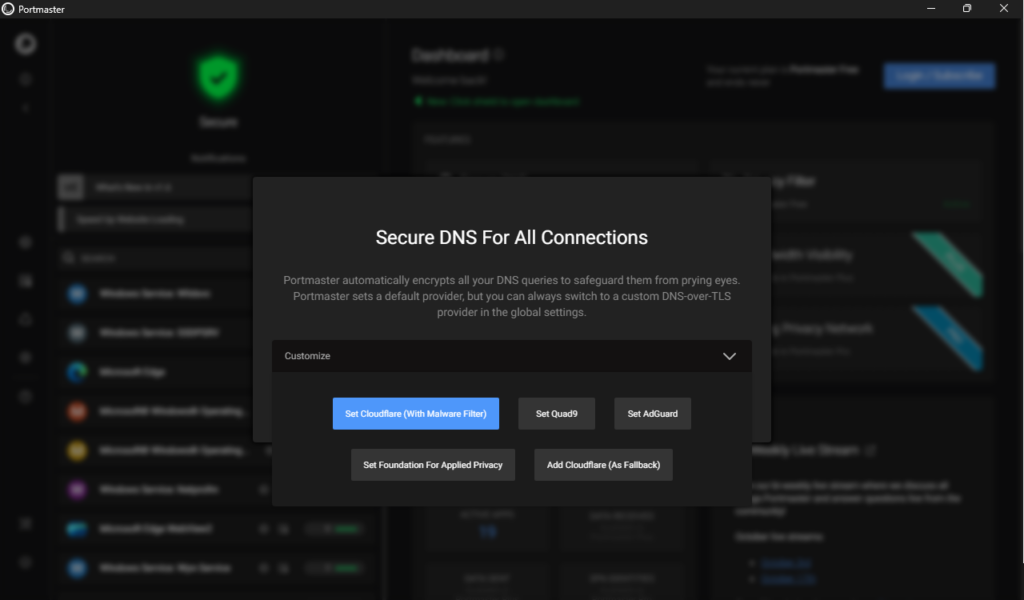
At this step we select the our DNS-over-TLS provider. This like in the previous step can always be altered at a later state. I just wanted to briefly cover the basic options to give you an idea of what Portmaster can offer.
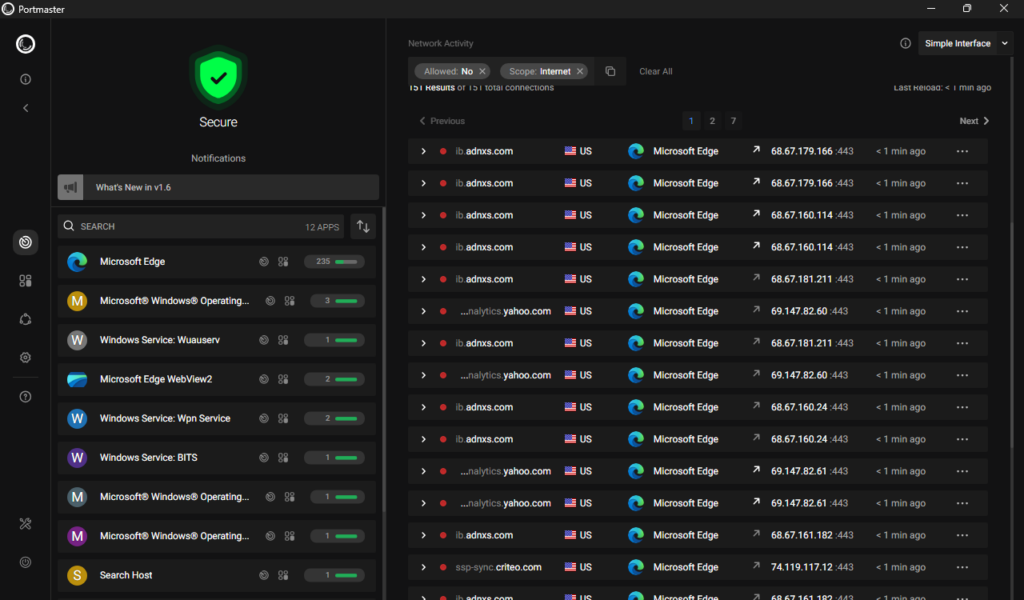
Here’s some Edge traffic overview. We can select to block specific inbound/outbound connections or disable Edge outright.
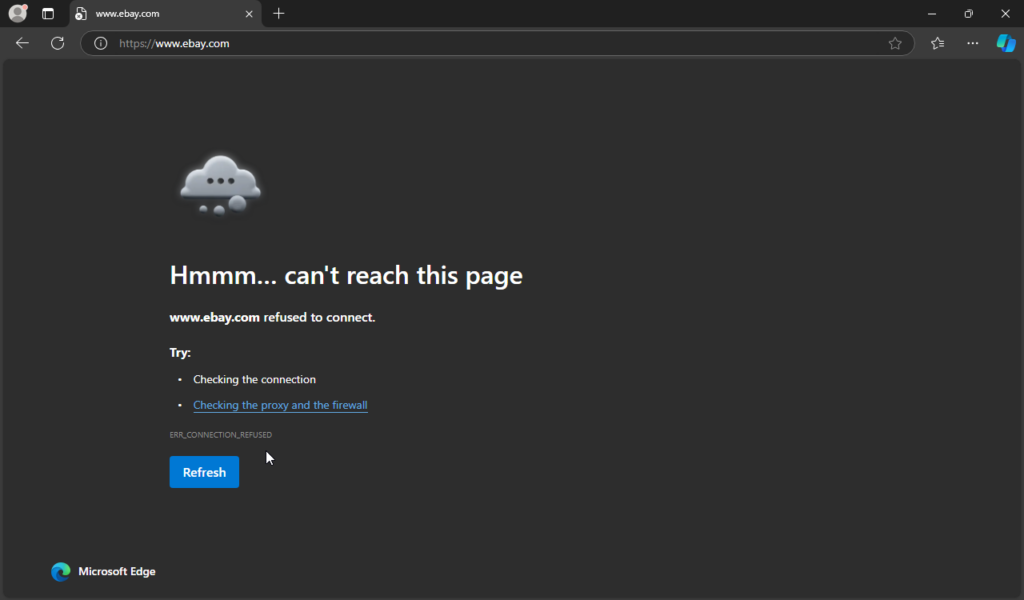
I went ahead and just disabled Edge as a quick example. As you can see, the browser is now essentially rendered useless. This isn’t a great real-world example as you would want to block specific connections. But you get the idea here.
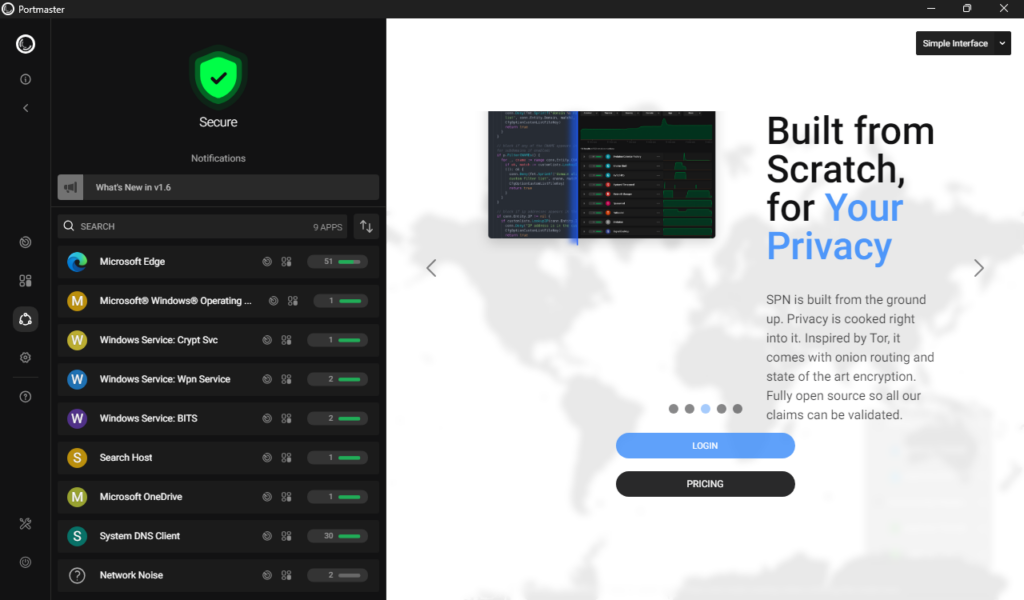
Another cool feature about Portmaster is that it offers what are called “SPNs” or “Safing Privacy Network” which is like an alternative to VPNs that was inspired by Tor (more on that here). VPNs are after all designed for security and not privacy, so Portmaster decided to offer this great service as an alternative. You can read more about the comparison of VPNs to SPNs on Portmaster’s blog here. I am by no means sponsored by Portmaster I just think they offer a really wonderful product.
Account Management
Since this guide focuses more on a local or home setting we won’t need to deal with managing Users in Active Directory, this will make this much more straightforward. But, to not skip any critical information, it’s important to know that you should always utilize the concept of Least Privilege when providing permissions to Users. Meaning the User should only have the level of privilege that is necessary to execute their duties/tasks. Of course this goes back to a more enterprise setting, but even at home and on your personal machine, you shouldn’t really be using an Administrative account to log in to your machine to complete basic daily tasks. These accounts should be strictly used for administrative tasks and for privilege escalations. Here is an important quote direct from Microsoft’s Local Accounts page:
As a security best practice, use your local (non-Administrator) account to sign in and then use Run as administrator to accomplish tasks that require a higher level of rights than a standard user account. Don’t use the Administrator account to sign in to your computer unless it’s entirely necessary.
Source: Microsoft
Now that we have that out of the way let’s continue.
Here, we will be mainly focusing on making sure you have a strong password, utilizing MFA wherever possible and separating your Administrator account.
Navigate to “Local Users and Groups” by pressing Windows + R to open the Run dialog and type “lusrmgr.msc”. It will look something like this:
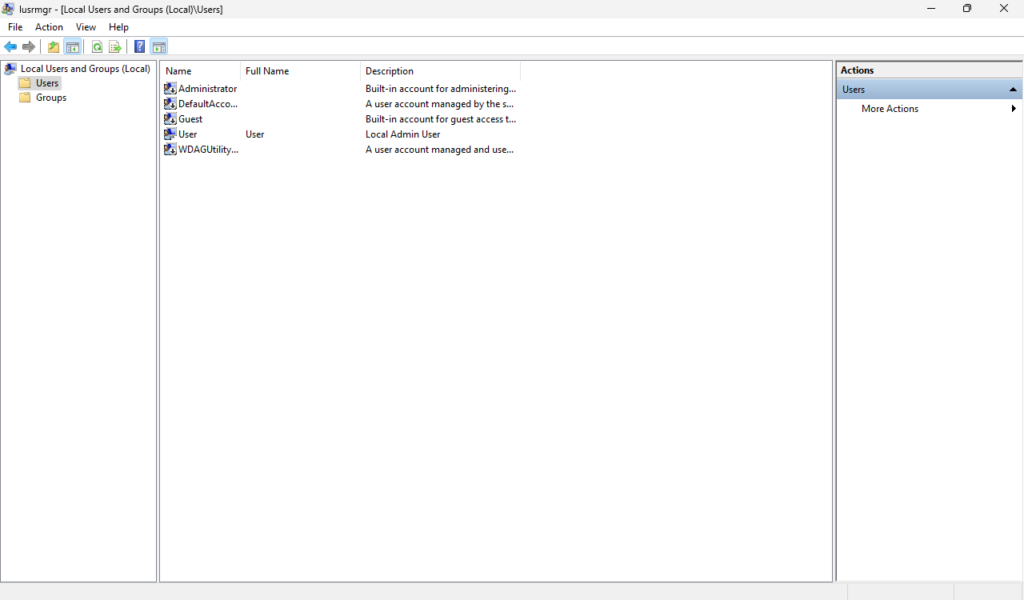
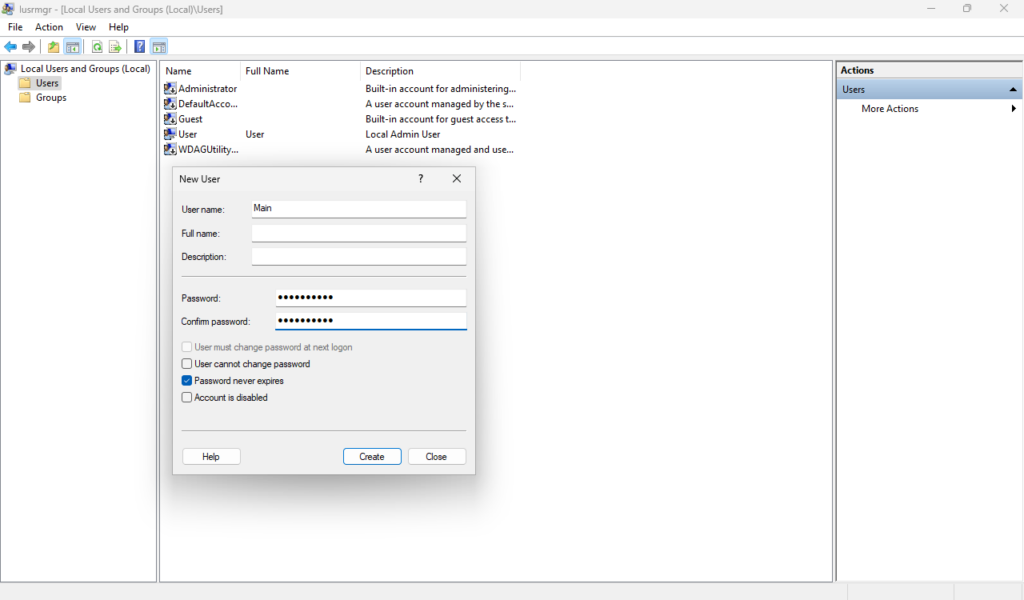
Right now I have one local account and it’s an administrative account. Let’s fix this by creating a strong password for the administrative account and creating a new low-level User for our daily tasks.
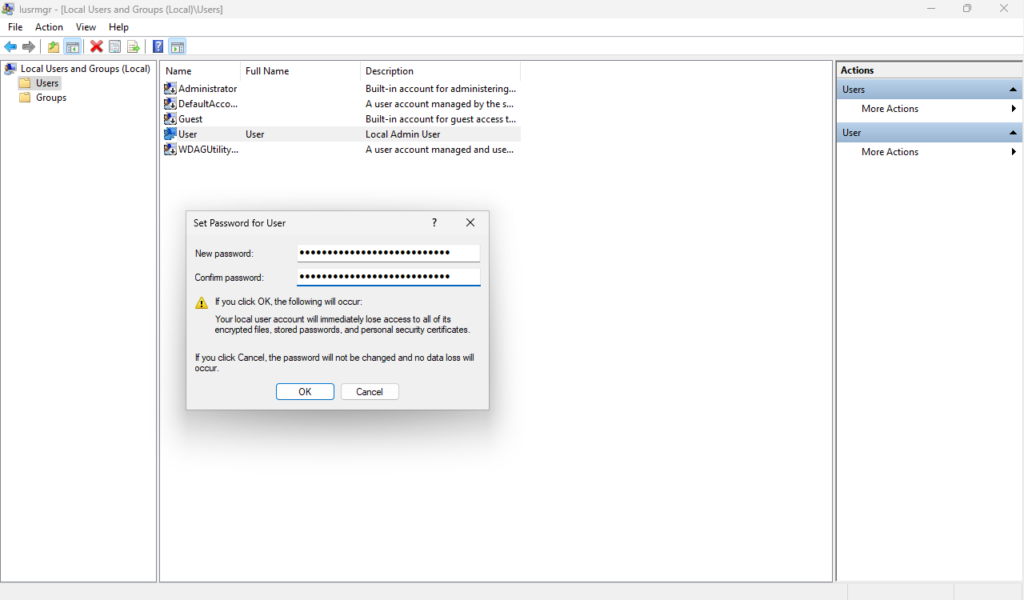
Right-click the User > Set Password… to change the password to something strong. You can ignore this message in this context since this doesn’t apply to us here. If this does apply to you, please be weary of making any changes if you don’t know how they will impact your environment.
Then on a blank area of the window, we can Right-click > New User… to create our new User. Now we will have a new User account that does not have administrative privileges by default.
Since this is just a sandbox VM, I don’t have any Microsoft accounts tied to it. If I did, I would apply MFA to them along with a strong complex password. Taking the time to configure all of your accounts with MFA whenever possible is important. Even if you don’t do it with ALL of your accounts, at least apply it to all the important ones. Meaning the ones that would cause you great grief if they were ever compromised. Its understandable to not have MFA everywhere. In fact not all platforms will provide an MFA option, although it is becoming more commonplace to see MFA options. Another thing I would like to mention is to use a password manager of some sort. There are so many options to choose from so I won’t cover that here, but please do yourself a favor and get one, you’ll thank me.
Anti-Virus (AV) and other Anti-Malware Solutions
Ok so there is quite a bit of selection here. There is much more to choose from than our firewall options.
Side Note – Many of these AV solutions even have their own firewall option built-in. I like to layer my approach here and use both, but pay close to the configurations so you don’t run into any issues.
When it comes to AVs, some quality solutions to note are Bitdefender Total Security, Kaspersky Total Security, Norton 360, McAfee Total Protection, Webroot AntiVirus and Sophos Home.
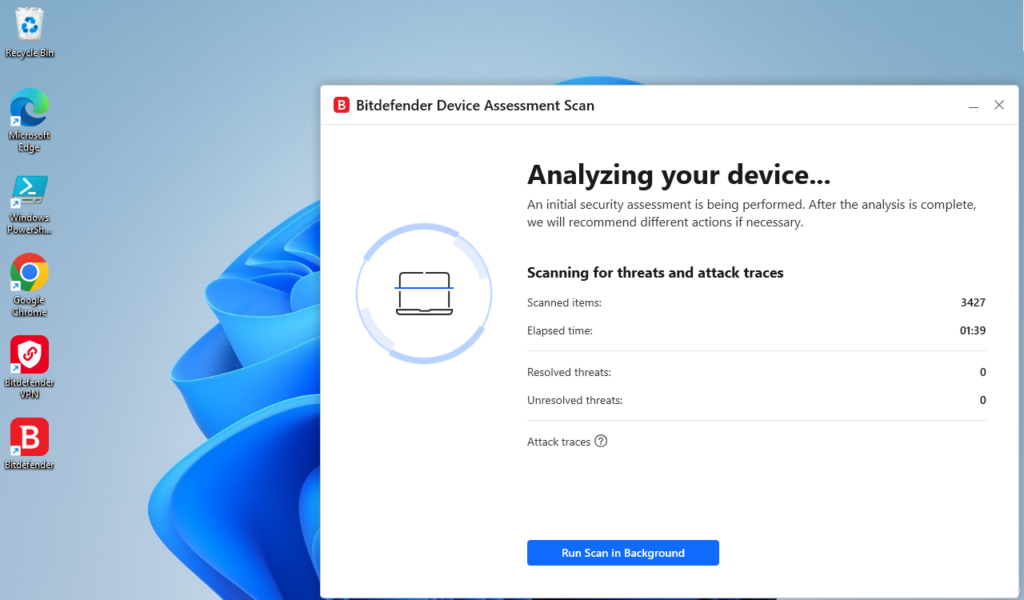
In this guide I will be sticking with Bitdefender as its my personal preference. I won’t go too in depth here as this isn’t a AV-specific post, but I’ll showcase what Bitdefender has to offer. It’s always important to do periodic full scans of your system to get an idea of your threat exposure.
Here’s a look at the Dashboard:
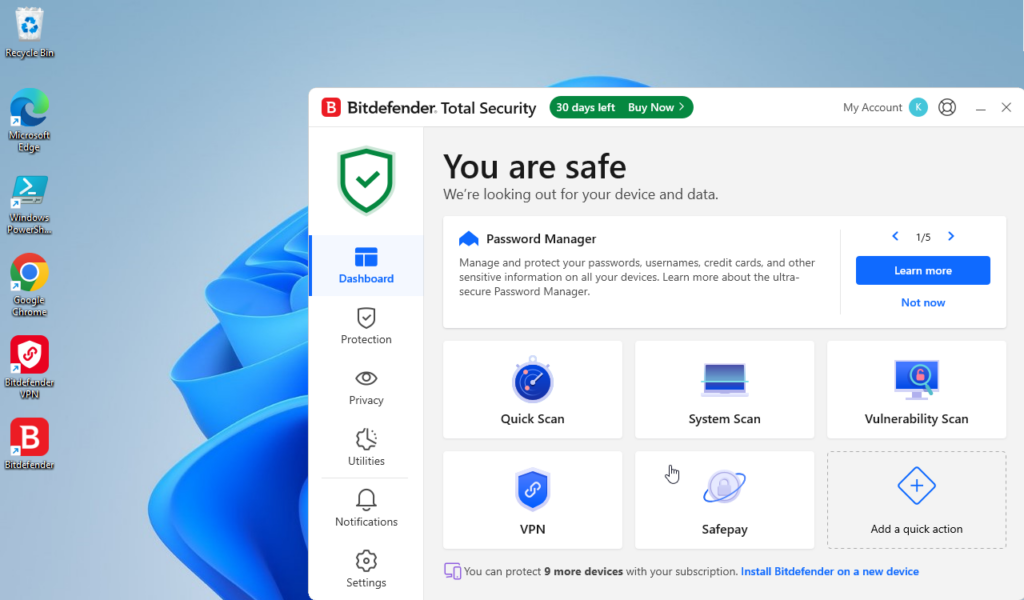
From here you can see your current status showing that BitDefender is active and not disabled. You can select to do a Quick Scan, System Scan or Vulnerability Scan. They also have quick access to their VPN and Safepay. We already did a Full Scan before so I’ll skip over this and the Quick Scan.
Side Note – Quick comment on Safepay as this is pretty cool. What this essential does is isolates the website and it’s data from any third party access through a separate process. This is intended to protect you from screen grabbers and keyloggers as it provides a virtual keyboard in addition to its isolation. Of course no individual solution is fool-proof and there are vulnerabilities in this too, but I wanted to highlight to point out its features.
The Vulnerability Scan is a great feature and offers insight on OS Security, Windows Updates, Weak Accounts, Applications and Network vulnerabilities. I did a quick scan (after changing my password) and this is what I got:
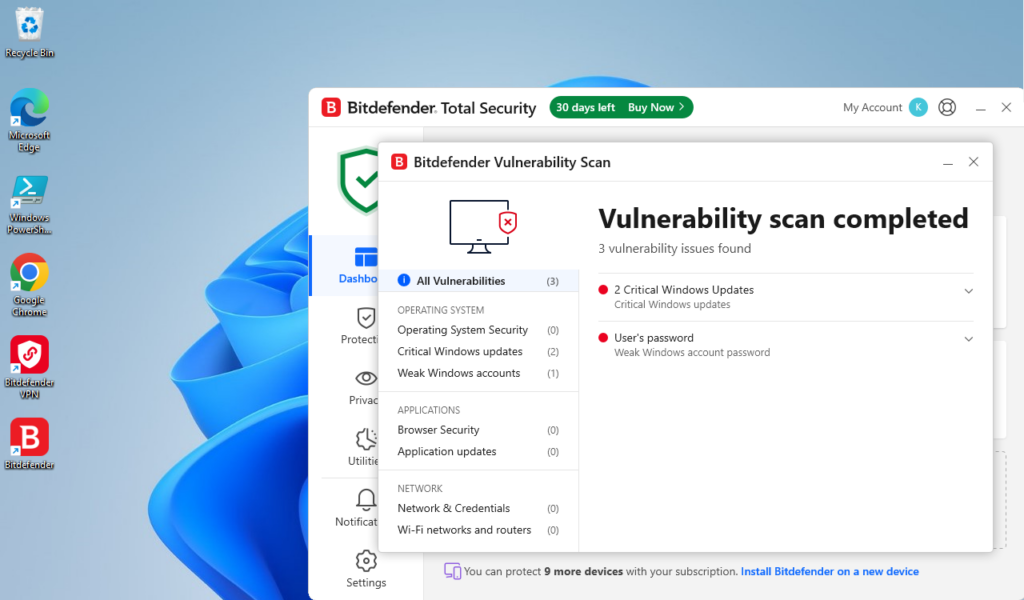
The scan was able to identify two missing critical updates and my weak password. I don’t have much installed on this machine outside what I am using here on this guide. But, if I had some outdated software or network misconfigurations, I would see them here.
Before I move away from BitDefender, let’s take a look at the Protection tab:
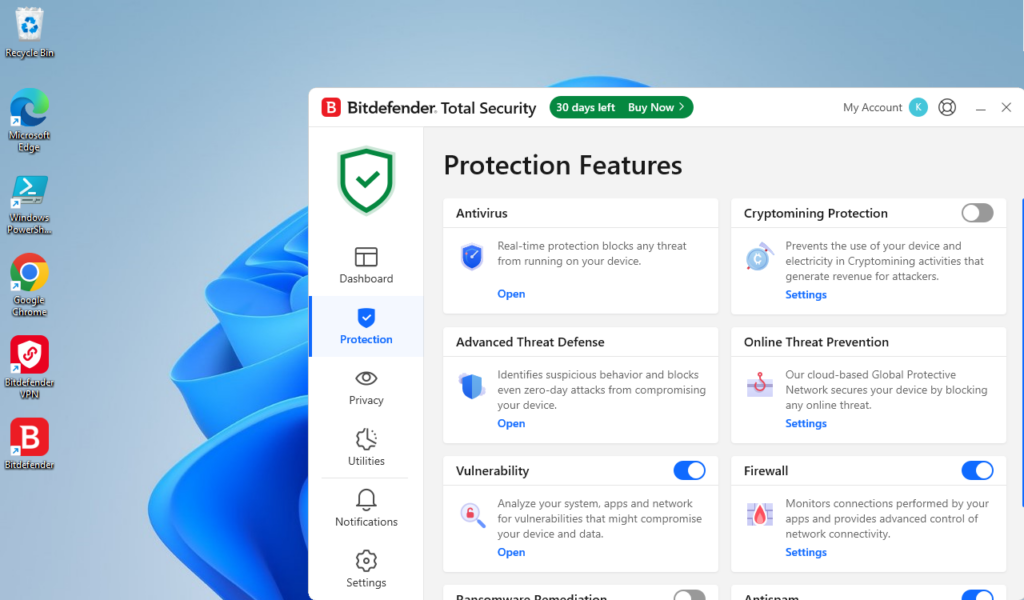
Here we can do a lot, manage exceptions, change settings, start scans, view quarantined items, pause BitDefender, etc. There is also the Firewall option as mentioned before. This allows some additional visibility and configurations into what applications can or can’t do on your machine. You also have some Cryptomining Protection, additional settings for Vulnerability scanning, Ransomware Protection, Spam Filters and Web Protection. I won’t go into depth about these, but you get the general idea. This is a pretty solid product I would highly recommend it, although you can’t go wrong with any of the options I mentioned above.
Now, let’s get into other Anti-Malware solutions such as “Second Opinion” scanners. One ring to rule them all may be enough for Middle Earth, but it doesn’t do justice in the Cyber Realm. Second Opinion scanners are used to conduct on-demand scans alongside your primary AV software to detect malware or threats that the main AV may have missed. They typically don’t have real-time protection so they won’t conflict with your existing AV solutions.
There are a few options here to note as well, such as: Malwarebytes, Hitman Pro and Emsisoft Emergency Kit. All are great options and I won’t be getting into detail with any of these here. But, I did want to cover one other platform that is in a way a “Second Opinion” scanner. That being the one and only VirusTotal! So this technically doesn’t fall under this category since it doesn’t scan your entire system. But, if you are concerned that you are receiving a false negative or false positive, turning to VirusTotal may be a game-changer. VirusTotal uses over 70 different AV engines to scan uploaded files. It can give you deep insight into what other AVs see in your file. I personally have had some great results using this platform.
Software Updates and Patch Management
Keeping your environment up-to-date is significantly important. Here is what needs to be focused on when it comes to your OS and software:
Enable and Schedule Automatic Updates
Ensure that automatic updates are enabled and that you periodically verify successful installations
Press the Windows key + R to open the Run dialog window and type in “services.msc”. Navigate down the list to ‘Windows Update” or by its Service name “wuaserv”.
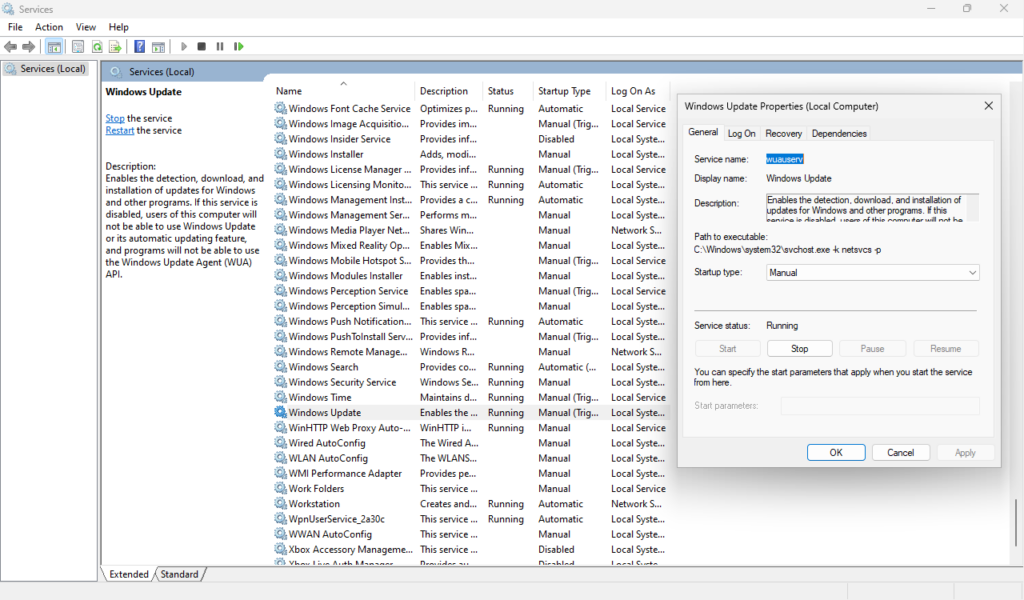
Here you need to verify that the service is running. If it is not, start it and if you would like it to run continuously, set the “Startup type” to Automatic.
Side Note – This is also a feature of my hardening script. Please see below for more information.
Update Third-Party Applications Regularly
Keep third-party applications up to date to mitigate vulnerabilities and check for updates on a scheduled basis.
Check with your software vendor for updates.
Verify and Update Device Drivers
Regularly check for updates on device drivers either through the manufacturer or Windows updates
There are two ways to accomplish this:
Press the Windows key + I to open Settings and then navigate to Windows Update > Advanced options > Optional Updates. Here you will see any options for Driver updates, if there are any available.
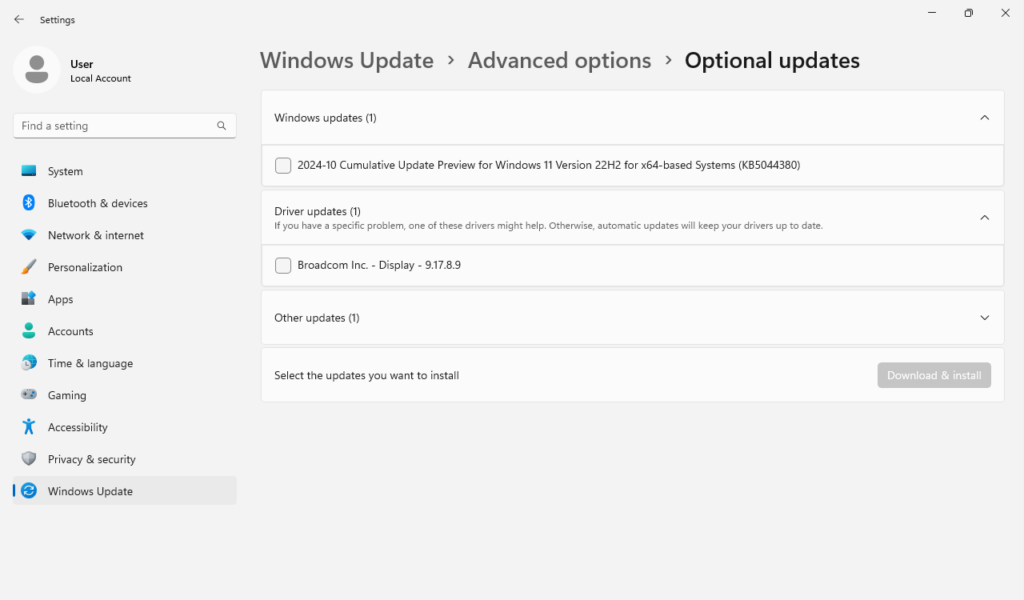
The second method would be to open your Device Manager (either via Start Menu Rick-click > Device Manager or open the Run dialog via Windows key + R and type “devmgmt.msc”).
Select the device you wish to update > Right-click > Properties > Driver tab. Here you will see current driver details via the “Driver Details” button and an option to “Update Driver”. From this option a dialog will pop-up asking if you have a local driver installation or you would like Windows to scan for driver updates automatically.
Data Encryption and File Protection
The data on our systems is what we often hold most sacred. Attackers know this and they are after it too. Having a good data encryption and file protection solution is crucial in helping maintain a secure system.
Here are some areas to focus on:
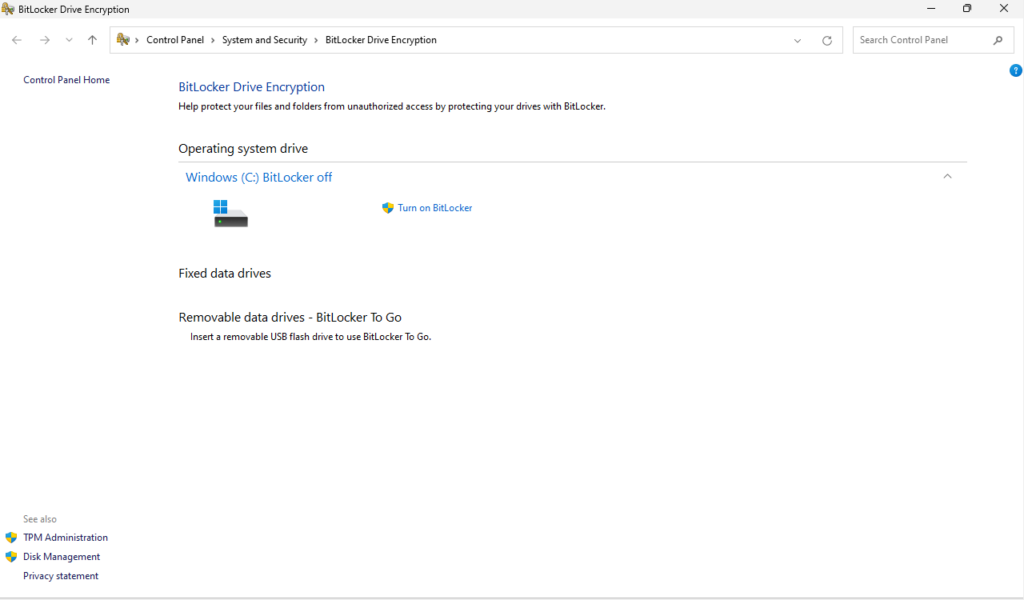
Enabling BitLocker for Full-Disk encryption
If your system supports it (available on Windows Pro and above), enable BitLocker to encrypt your entire drive
Encrypting Sensitive files with EFS
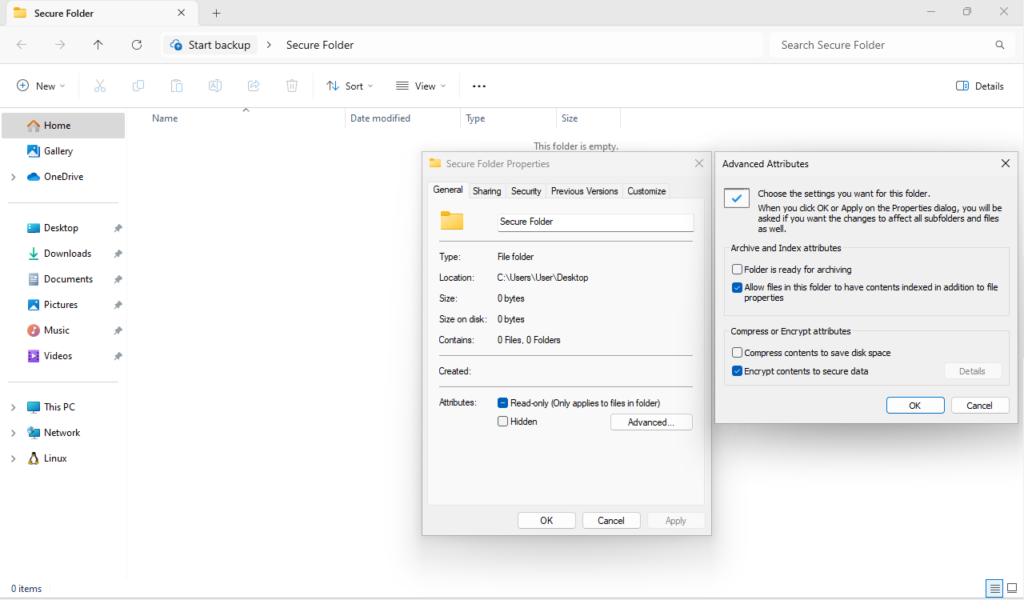
Enable EFS on Important Files, this will encrypt files so they’re accessible only with your account
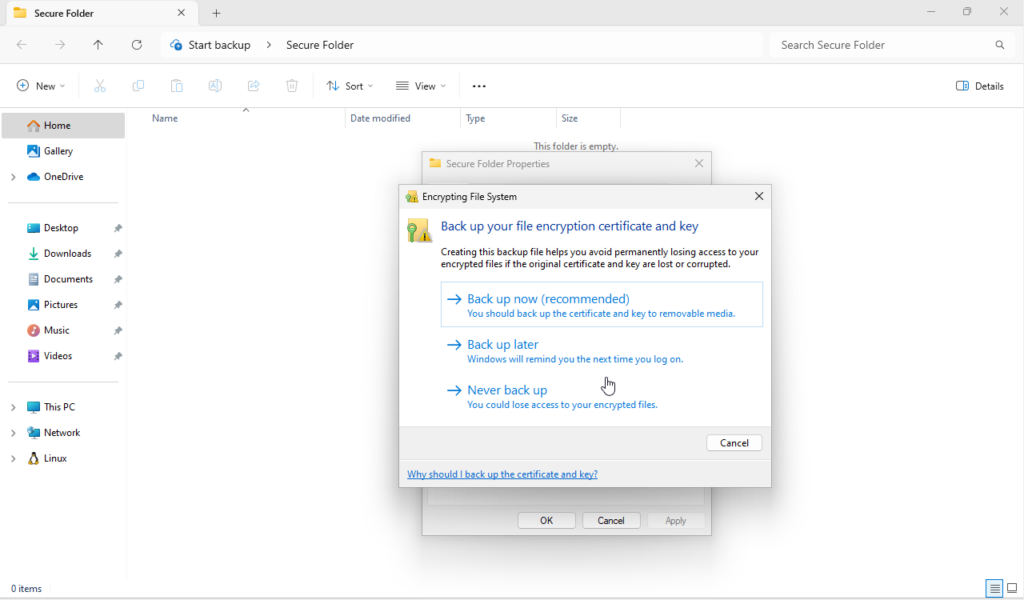
Select the folder you wish to encrypt, Right-click > Properties > Advanced > Check-off “Encrypt contents to secure data” > Click “Ok” > Click “Apply” > Follow the prompts.
Save your encryption key on an external device like a USB flash drive.
Secure your Backups with Encryption
If you back up data to an external drive, enable encryption on the drive (using BitLocker or a third-party tool like VeraCrypt) to ensure backup data remains secure
Make sure you not only have a backup routine in place, but that you secure your backup contents through some sort of encryption method.
Protect Sensitive Folders with Controlled Folder Access
Enable Controlled Folder Access, this prevents untrusted applications from modifying files in protected folders, providing an additional layer of protection against ransomware
Open up a PowerShell or Terminal Window as an Administrator and type the following command:
Set-MpPreference -EnableControlledFolderAccess Enabled
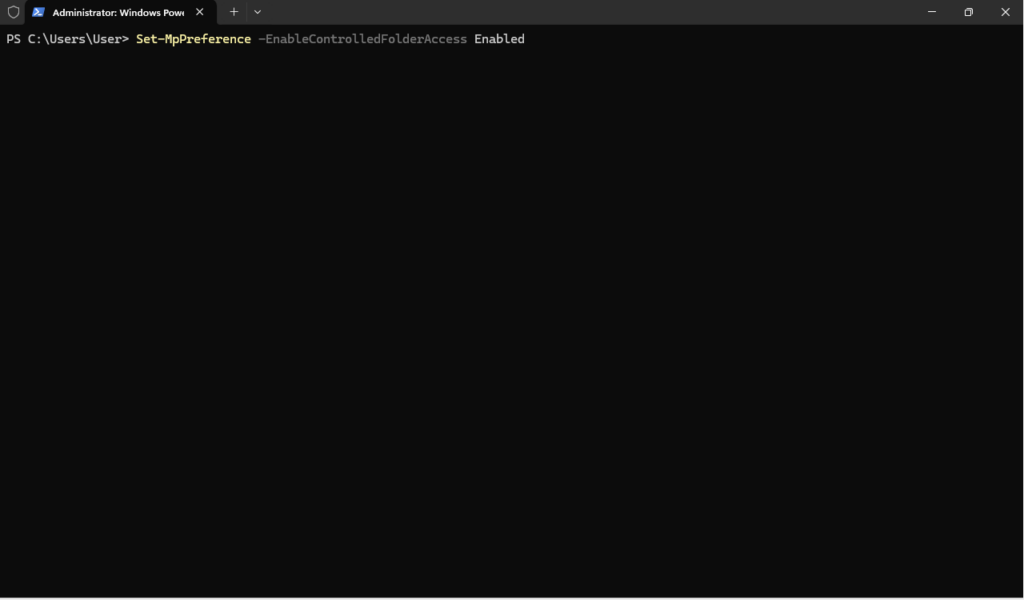
Type the following command to confirm the feature is enabled:
Get-MpPreference | Select-Object -Property EnableControlledFolderAccess
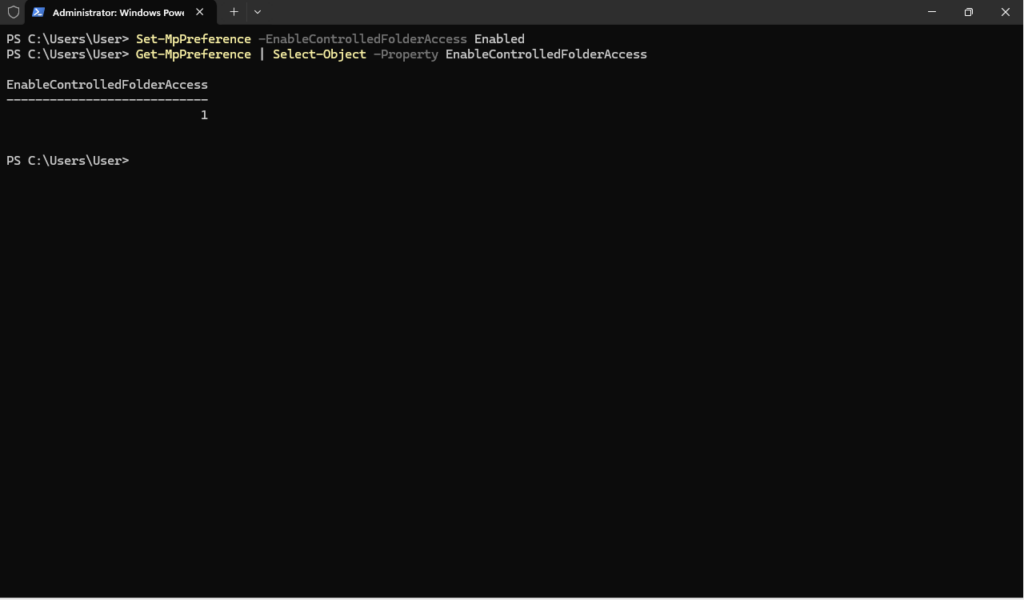
This restricts untrusted applications from making changes to files within designated folders (such as Documents, Pictures, Videos and Desktop). Only trusted applications are allowed to modify files in these protected locations.
You will need to add additional folders if you would like those protected by this feature. You can do so by pressing the Windows key + I to open Settings and then navigate to Privacy & security > Windows Security > Virus & threat protection > Manage ransomware protection.
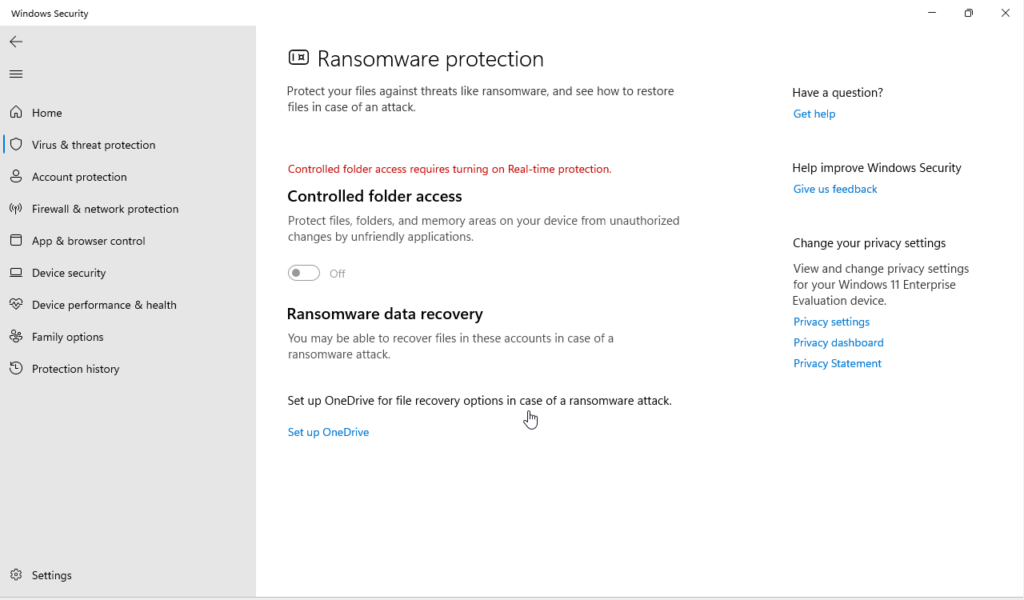
Here you will have an alternate way to enable the Controlled folder access setting and configure what folders are protected.
Side Note – This feature requires Real-time protection for Windows Defender turned on. This means you cannot enable this feature while using a third-party AV solution. However, many third-party solutions have similar ransomware protection. See you AV vendor’s website for more information.
You can read more about Controlled Folder Access via Microsoft’s page on Protect important folders with controlled folder access.
Secure Temporary Files and Sensitive Data in Memory
Encrypt the Windows paging file to protect sensitive data in memory
This is mainly precautionary to prevent anyone accessing your page file through memory. What this does is moves the data stored in virtual memory each time the system shuts down, reducing the risk of sensitive information being left on disk.
To accomplish this press the Windows key + R to open the Run dialog, then type “gpedit.msc” to open the Local Group Policy Editor, then navigate to Computer Configuration > Windows Settings > Security Settings > Local Policies > Security Options, then double-click “Shutdown: Clear virtual memory pagefile” and make the necessary changes.
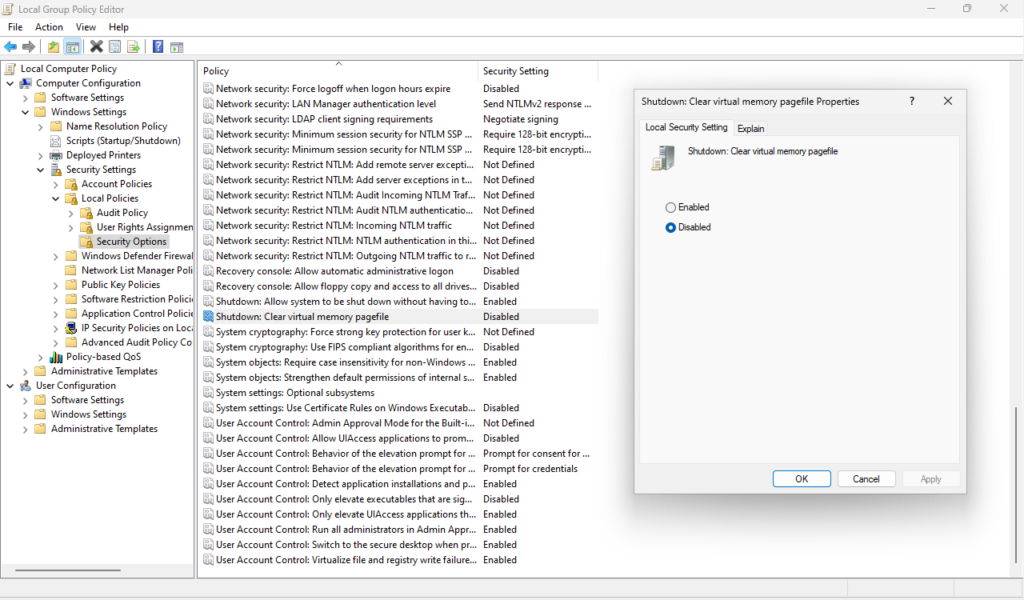
This can also be done via the Registry by modifying HKEY_LOCAL_MACHINE\SYSTEM\CurrentControlSet\Control\Session Manager\Memory Management. This requires editing the value for “ClearPageFileAtShutdown” to “1” to ensure the pagefile is not readable after shutdown. This is also included in my hardening script.
Manage Access Controls on Files and Folders
For sensitive files, configure custom permissions rather than inheriting permissions from parent folders
This is pretty straightforward, limit User access to the files and folders they should have access to. Now in a home setting this may not be all too important, but let’s go through it in case you do have other Users on your system you need to control.
Right-click the file or folder in question and select Properties > click on the Security tab > click on Advanced > click on Disable Inheritance. This breaks the automatic permission flow from its parent folder, allowing you to set unique, custom permissions for that specific item.
You will be prompted to select from two options:
Convert inherited permissions into explicit permissions on this object: Keeps the current inherited permissions as custom permissions, allowing you to edit them further.
Remove all inherited permissions from this object: Removes all inherited permissions, allowing you to start fresh with custom settings.
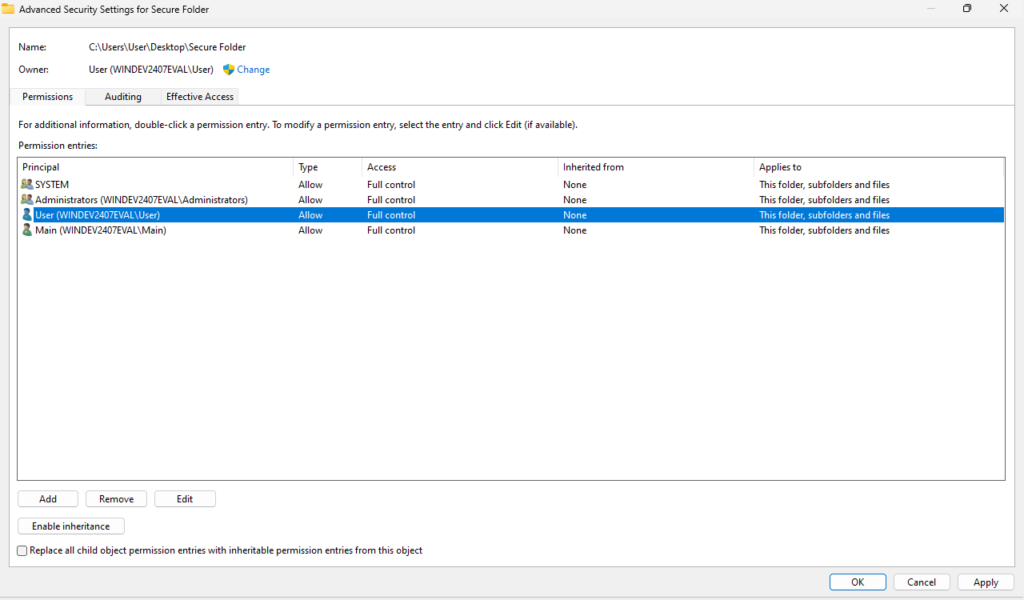
Select the option that suits your needs. Now you can click on the “Add” button to add specific Users or Groups to the folder or file. You can remove or edit current selections as well.
Securely Delete Sensitive Files
When deleting sensitive files, use a secure erasure tool (such as Eraser or CCleaner’s Drive Wiper Tool) to overwrite the data and make it unrecoverable
Here we will take a quick look at Eraser, an open-source software that allows Users to permanently delete sensitive files and folders. It overwrites the data on your hard drive, ensuring that the deleted information is unrecoverable even with specialized data recovery software.
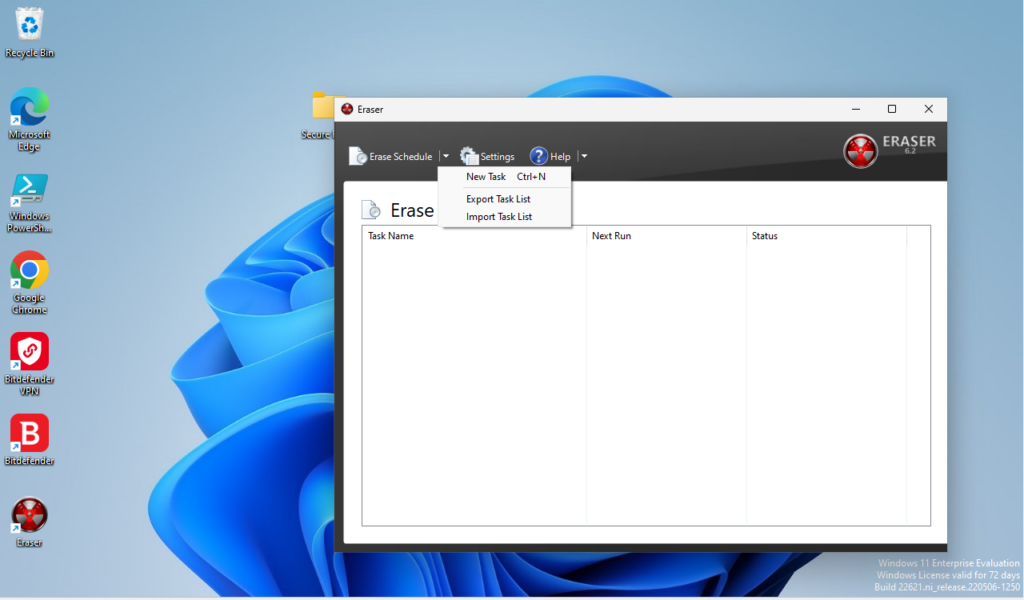
Once installed, open the software and click-on the down arrow next to “Erase Schedule” > select “New Task”:
On the Task Properties window, click-on “Add Data” and under the Settings field > click-on Browse and select the file you wish to permanently erase.
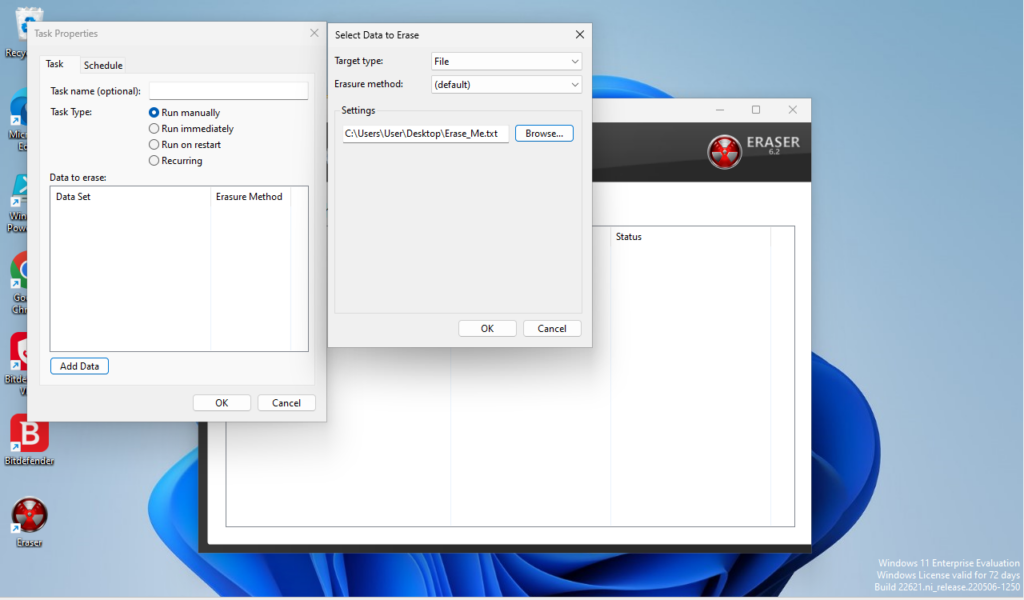
Click-on “Ok” once you have made your selection. Now if you did not select a schedule for your file to run, you can right-click on the task under the “Erase Schedule” and select “Run Now” to have the erasure process commence.
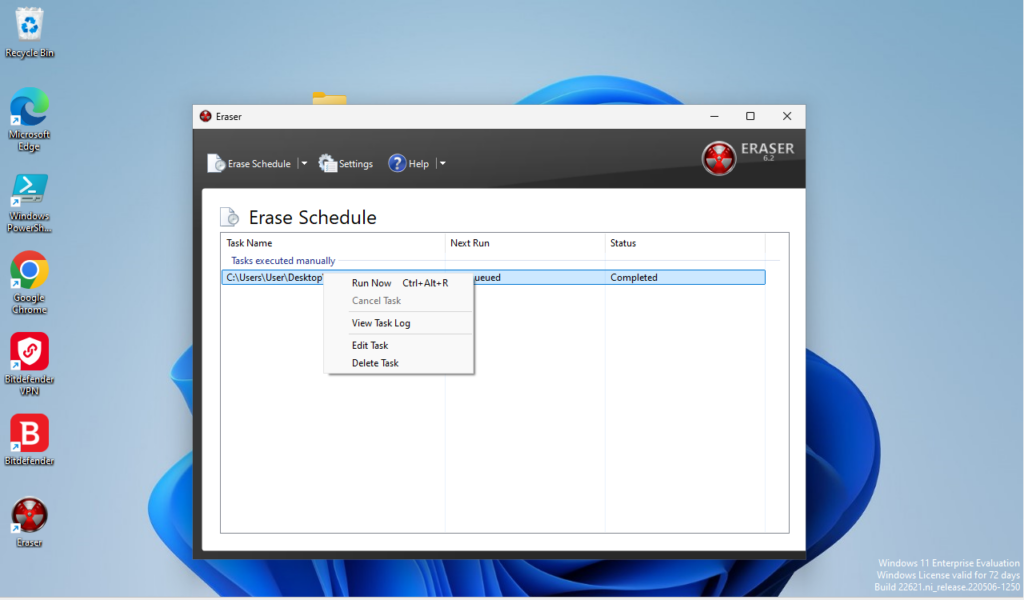
There you go! The file should be permanently removed from your system. This is just one method that allows you to accomplish a secure delete method, feel free to explore other options.
Logging and Monitoring
By implementing these logging and monitoring steps, you can strengthen visibility into your system’s activities, detect potential threats early, and maintain a secure, well-documented environment. Regular log reviews and alerts allow you to respond quickly to suspicious actions and improve your overall security posture.
Enable Detailed Logging in Event Viewer
Enable logging for account management and system changes, such as software installations or permission modifications
Press the Windows key + R to open the Run dialog, type in “gpedit.msc” this will open the Local Group Policy Editor, from here navigate to Computer Configuration > Windows Settings > Security Settings > Advanced Audit Policy Configuration > Audit Policies > Account Management. From here double-clock and enable “Audit User Account Management” and “Audit Security Group Membership”. Under “Configure the following audit events” select “Success” to log successful events, “Failure” to log unsuccessful attempts, or both as needed.
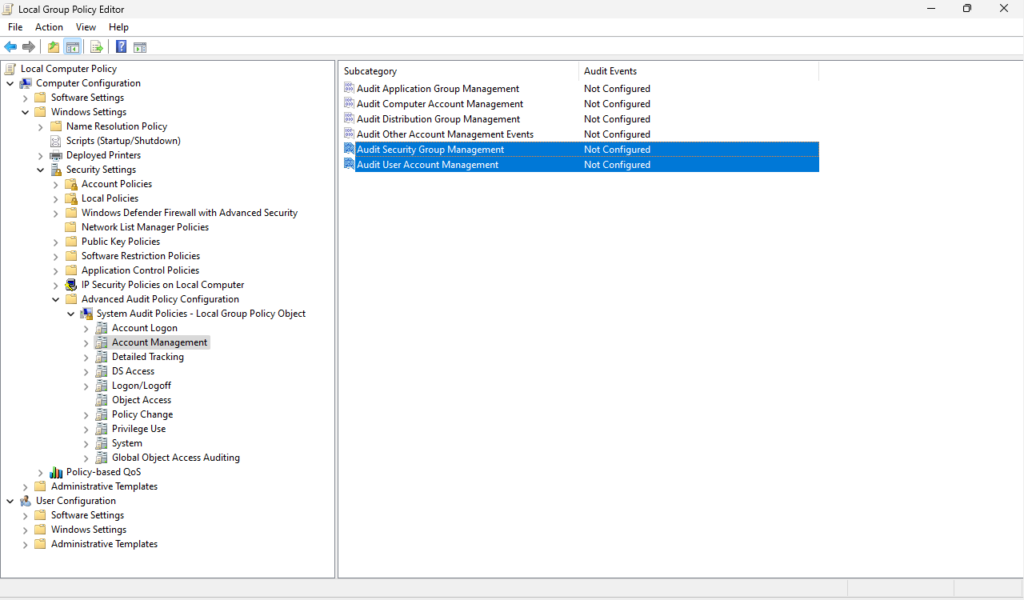
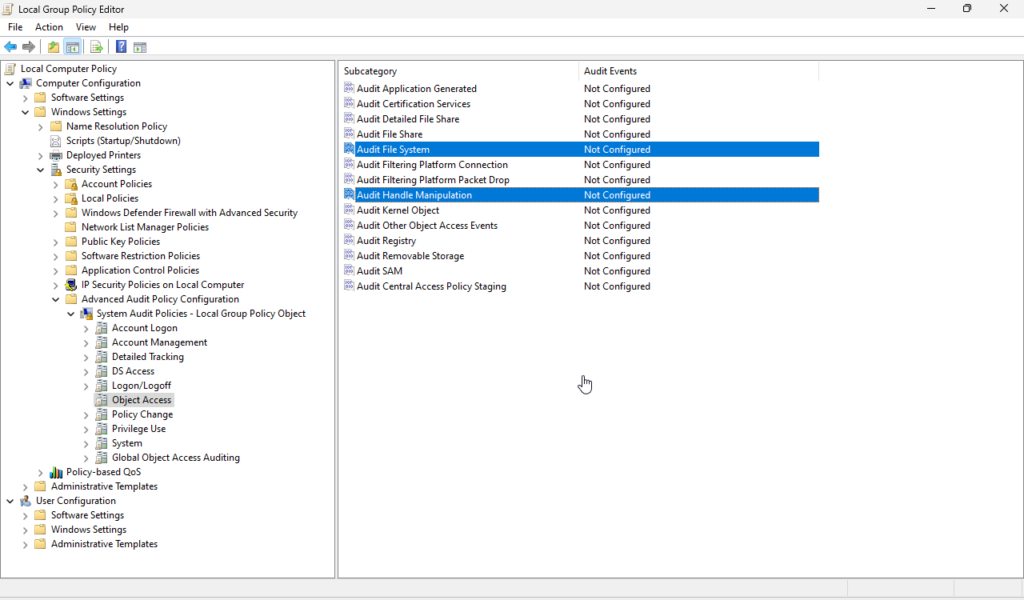
Now navigate from Account Management to Object Access. From here double-click to enable “Audit File System” and “Audit Handle Manipulation” to log detailed access to files. Under “Configure the following audit events” select “Success” to log successful events, “Failure” to log unsuccessful attempts, or both as needed.
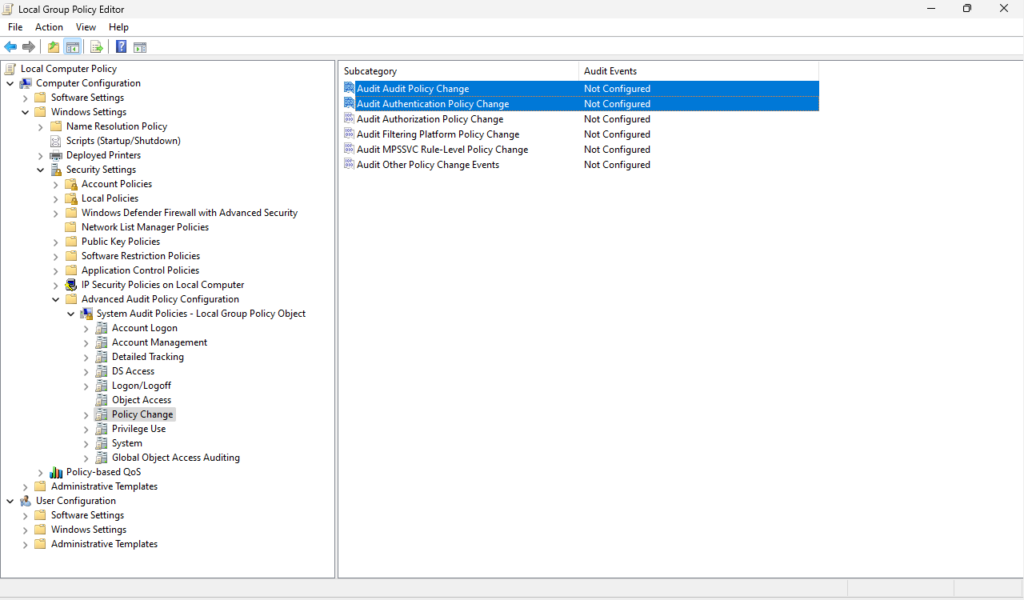
Now navigate from Object Access to Policy Change. From here double-click to enable “Audit Audit Policy Change” and “Audit Authentication Policy Change”. Under “Configure the following audit events” select “Success” to log successful events, “Failure” to log unsuccessful attempts, or both as needed.
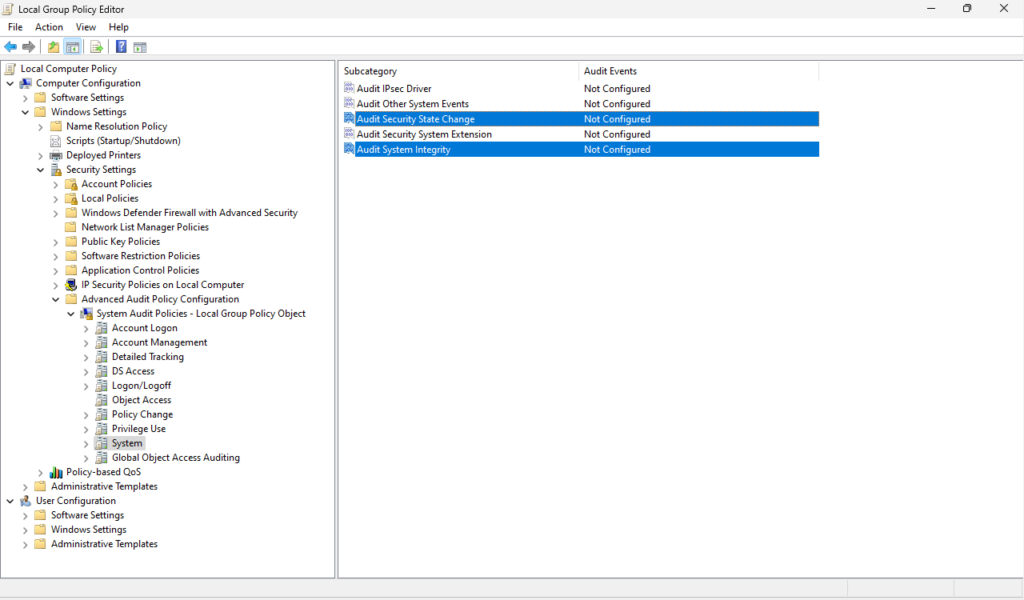
Lastly, navigate from Policy Change to System. From here double-click to enable “Audit Security State Change” and “Audit System Integrity”. Under “Configure the following audit events” select “Success” to log successful events, “Failure” to log unsuccessful attempts, or both as needed.
Restart your machine to have these changes to take effect. Monitor the Event Viewer to see the changes reflected in the system’s logging.
Enable PowerShell Logging
Regularly check these logs for suspicious scripts or commands, as attackers often use PowerShell to run malicious scripts
Press the Windows key + R to open the Run dialog, type in “gpedit.msc” to open the Local Group Policy Editor. From here navigate to Computer Configuration > Administrative Templates > Windows Components > Windows PowerShell. Double-click “Turn on Module Logging” to enable this feature. Once enabled, you can click on “Show” to enter specific module names.
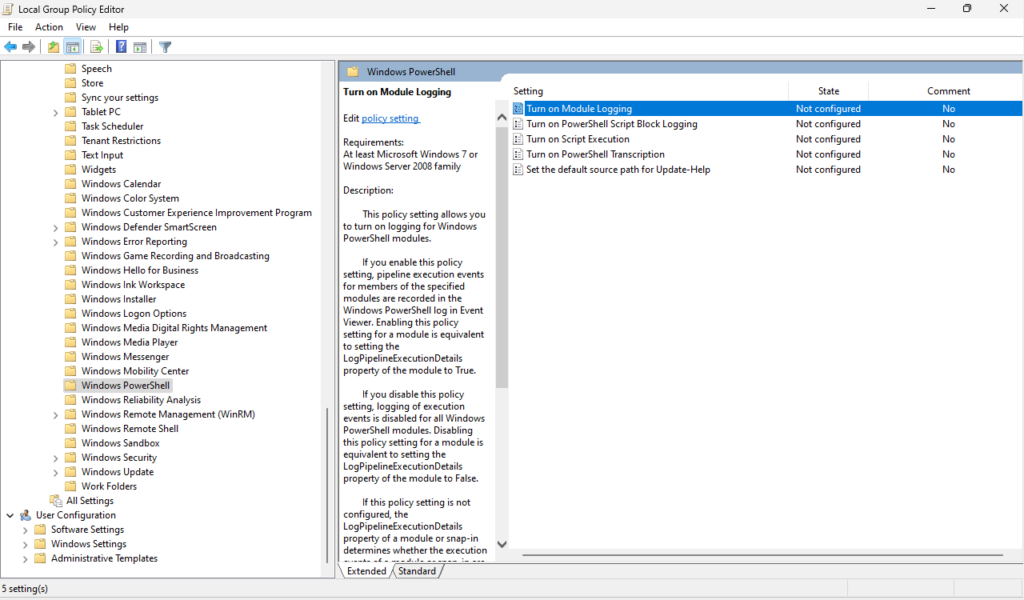
Now double-click on “Turn on PowerShell Script Block Logging” to enable it. You can also select the option to “Log script block invocation start / stop events” if you need to.
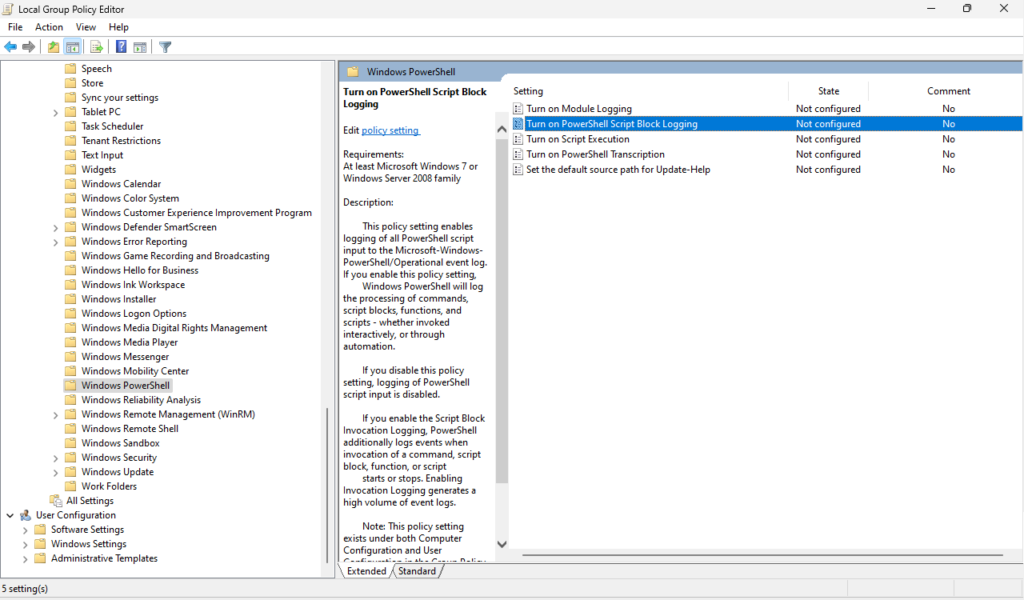
Please restart your machine to see changes go into effect. If you navigate to the Event Viewer > Applications and Services Logs > Microsoft > Windows > PowerShell > Operational you will see any logs related to the PowerShell changes we made above.
Enable Sysmon for Advanced System Monitoring
Install and Configure Sysmon: Sysmon (from the Sysinternals Suite) is a powerful tool that provides detailed logging of process creation, network connections, file creation, and more
First you will need to go and download Sysmon. Download the archive and extract it. Navigate to the Sysmon directory and open a Command Prompt or PowerShell window as an Administrator. Run the following command to install Sysmon and configure it:
.\sysmon -accepteula -i
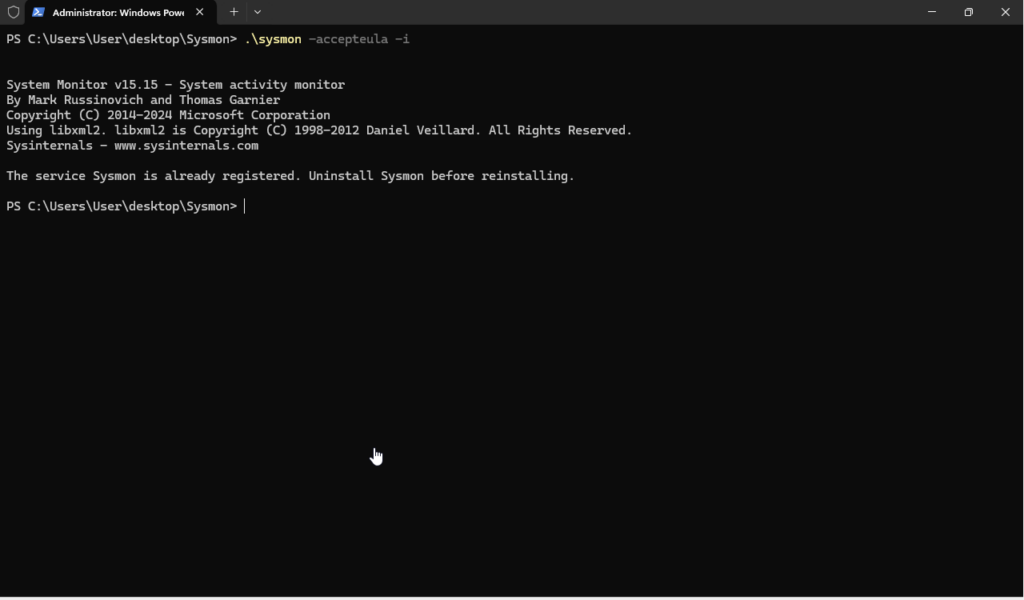
This installs Sysmon with the default configuration, which logs process creation events.
To get the most out of Sysmon, use a custom configuration file that specifies the types of events you want to log. You can either create your own configuration or use a popular community configuration file, such as SwiftOnSecurity’s Sysmon Config. Once you have a configuration file, apply it to configure Sysmon like so:
.\sysmon -c sysmonconfig-export.xml
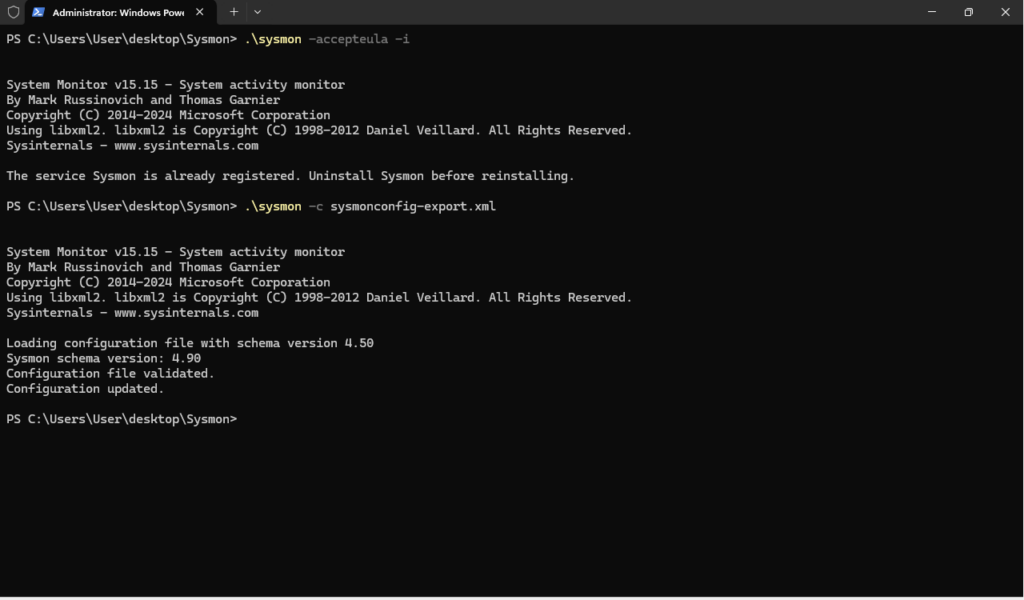
Now to confirm the configuration was applied to Sysmon, navigate to your Event Viewer by pressing the Windows key + R to open the Run dialog and type “eventvwr” to launch the Event Viewer. From here navigate to Applications and Services Logs > Microsoft > Windows > Sysmon > Operational to view Sysmon data.
You should review your Sysmon configuration periodically to ensure you’re logging relevant events. Also, keep in mind that Sysmon can generate a large number of logs, so consider enabling log rotation or increasing storage if needed.
Enable Security Auditing for File and Folder Access
Set up audits for access to this folder. This records who accessed the folder and when, providing valuable information on potential unauthorized access.
Press the Windows key + R to open the Run dialog, type in “gpedit.msc” to open the Local Group Policy Editor. From here navigate to Computer Configuration > Windows Settings > Security Settings > Advanced Audit Policy Configuration > Object Access. Double-click “Audit File System” to enable this feature. Under “Configure the following audit events” select “Success” to log successful events, “Failure” to log unsuccessful attempts, or both as needed.
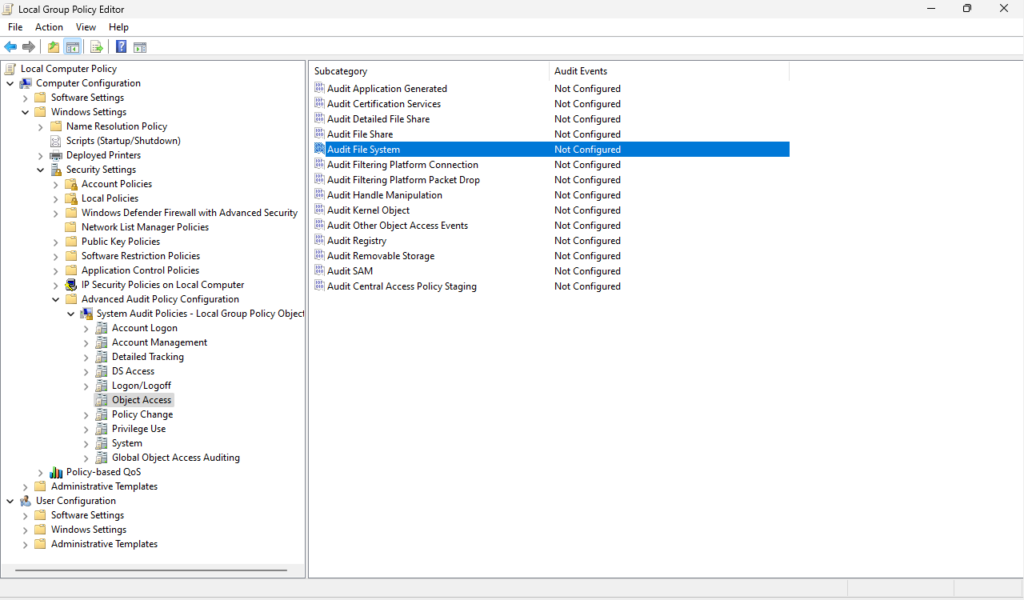
You can also setup folder-specific auditing. Right-click the file or folder in question and select Properties > click on the Security tab > click on Advanced. In the Advanced Security Settings, navigate to the Auditing tab. From here you can click the “Add” button to add an auditing entry.
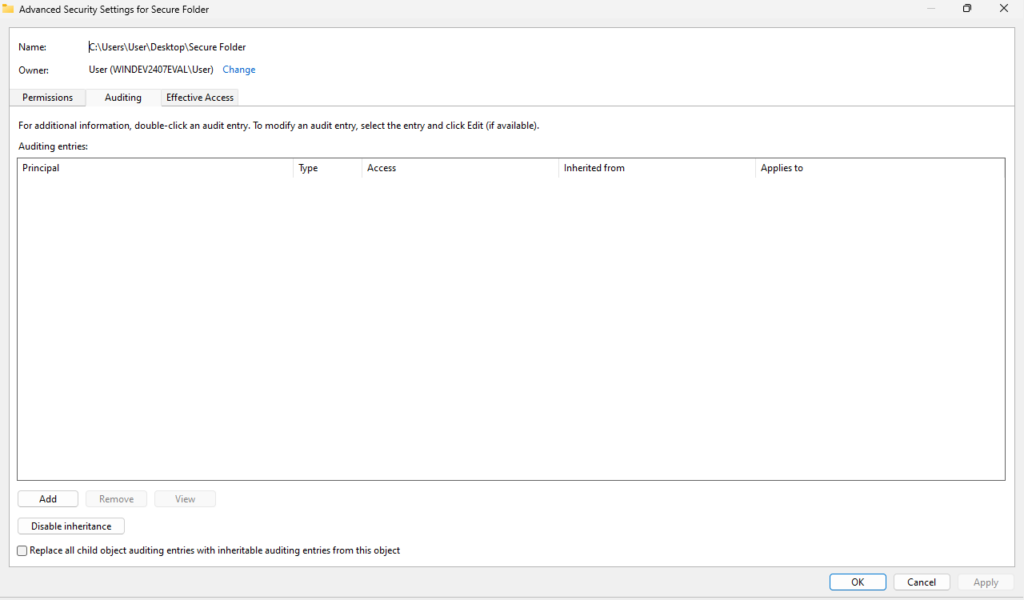
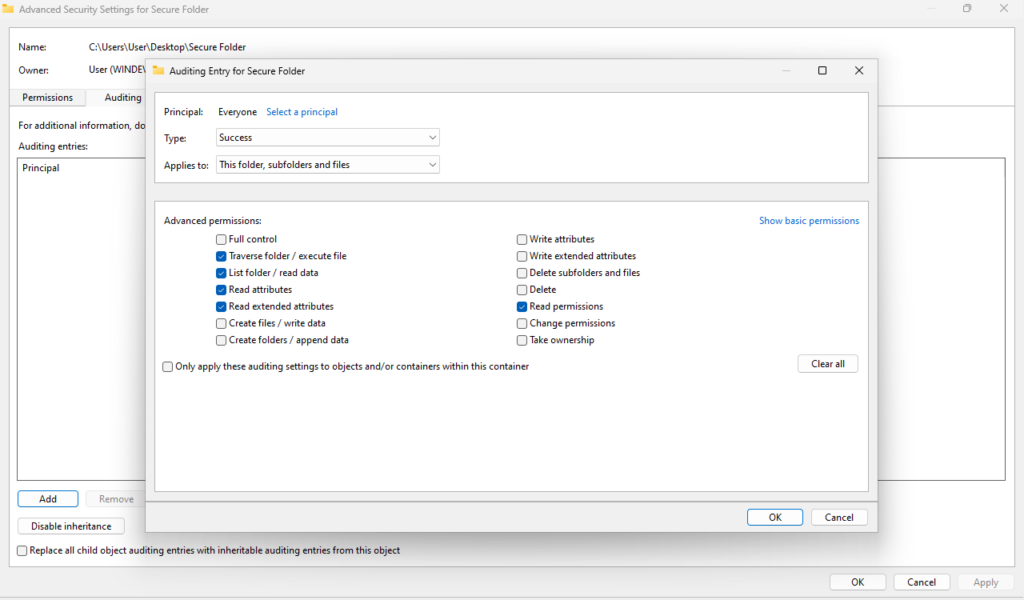
Now you can select a Principal, then enter a name of a User, Group or Everyone if you want to audit all access. Then set “Type” to All to audit all types of access, or specify Fail or Success. Then you must select what this applies to this folder, subfolders, files, etc. Finally, in the Permissions section, select the types of access you want to audit, Full control, create files, create folders, delete, etc.
Set Up and Regularly Review Event Viewer Custom Views
Regularly Monitor Custom Views, Schedule regular times to review these custom views to catch any unusual activity patterns early
Setting up and regularly reviewing Custom Views in Event Viewer can help streamline monitoring by filtering specific types of events for easier analysis. Here’s a breakdown on how to set up, customize, and review these views regularly:
Navigate to your Event Viewer by pressing the Windows key + R to open the Run dialog and type “eventvwr” to launch the Event Viewer. From here right-click on Custom Views and select “Create Custom View”.
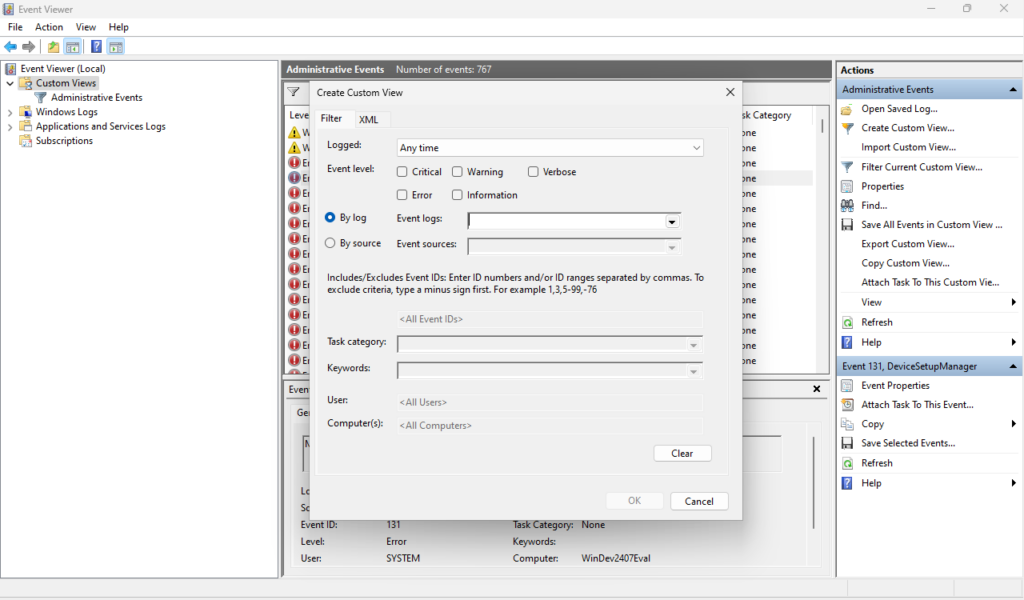
In the Create Custom View window, set filters based on:
Time Range – Choose specific dates if needed, though it’s typically left blank for ongoing monitoring.
Event Level – Select event levels such as Critical, Error, Warning, or Information based on the types of events you’re tracking.
Event Logs – Choose logs to monitor, such as Windows Logs > Security, Application, etc.
Keywords – Add keywords or enter specific Event IDs related to events you want to track (e.g., Event ID 4663 for file access auditing).
Once you name the view and save, this will be appear under your Custom Views. Determine a regular review schedule, such as daily, weekly, or monthly, depending on the sensitivity of the data and your monitoring needs.
Configuring Privacy Settings
You can reduce data collection, limit unnecessary app access, and enhance overall privacy on your Windows machine. These settings provide greater control over personal data, improving both security and privacy in your day-to-day usage.
Configure Privacy and Telemetry Settings
Limit data collection by accessing privacy settings and disabling or restricting features like diagnostic data and location tracking that aren’t essential for your use.
Limit Data Collection in Windows Privacy Settings
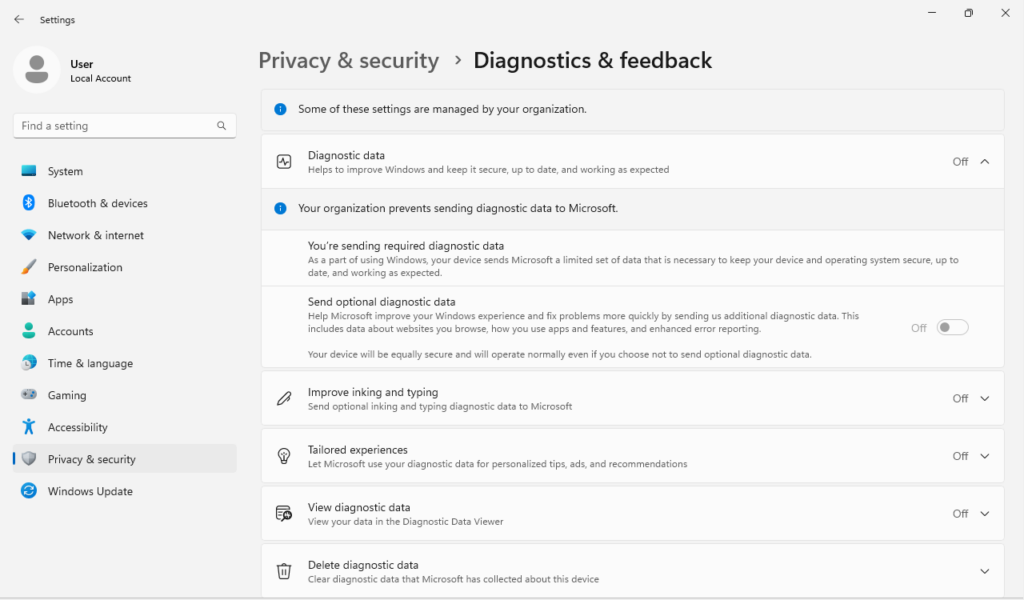
Press the Windows key + I to open Settings, navigate to Privacy & security > Diagnostics & feedback and turn off everything.
Disable Location Tracking
Now navigate back to Privacy & security > Location and turn off any location settings.
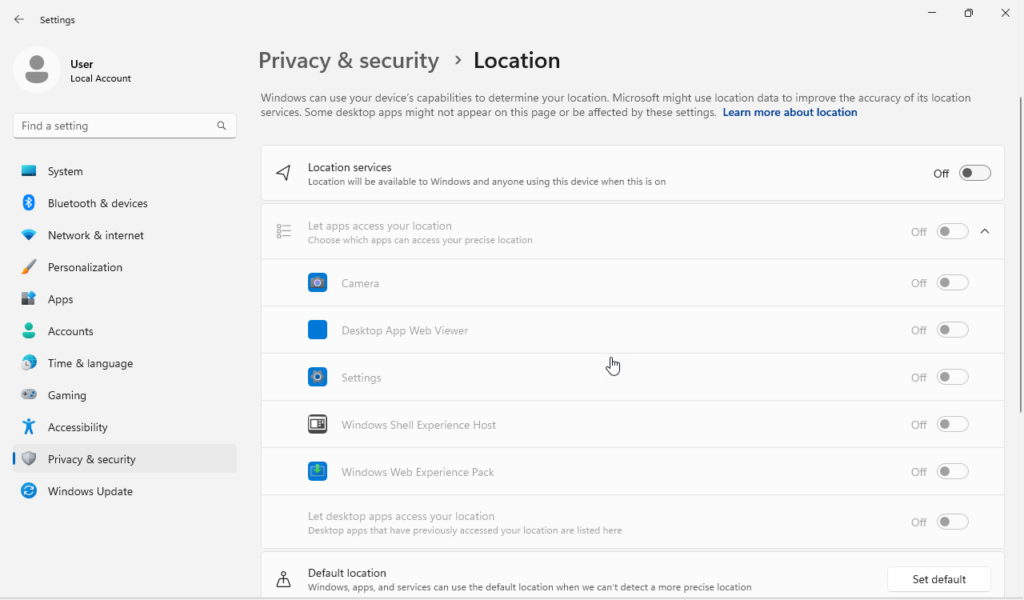
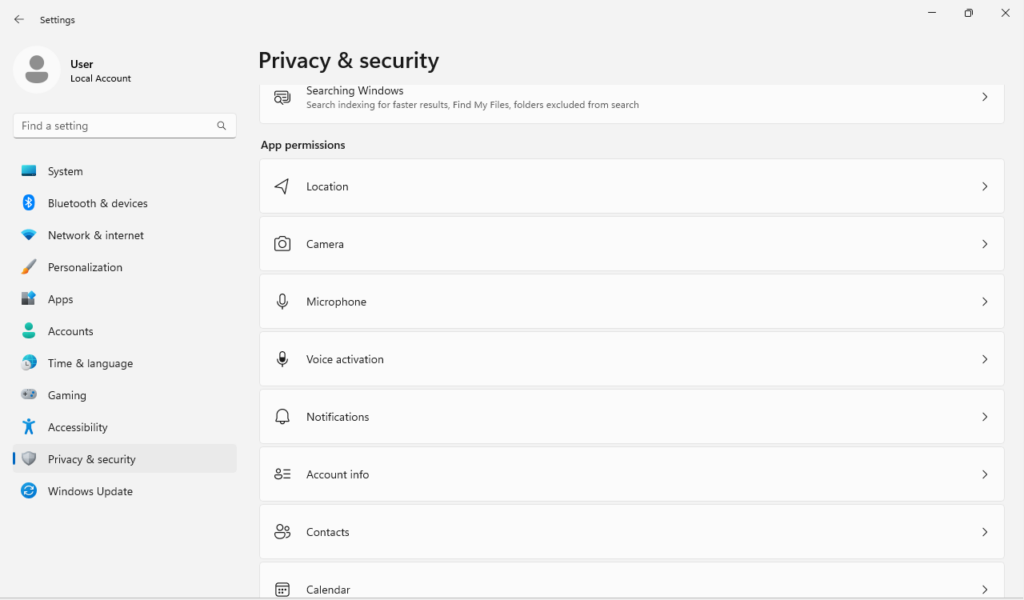
Control App Permissions
From here go back to Privacy & security > App permissions and adjust individual application permissions as needed.
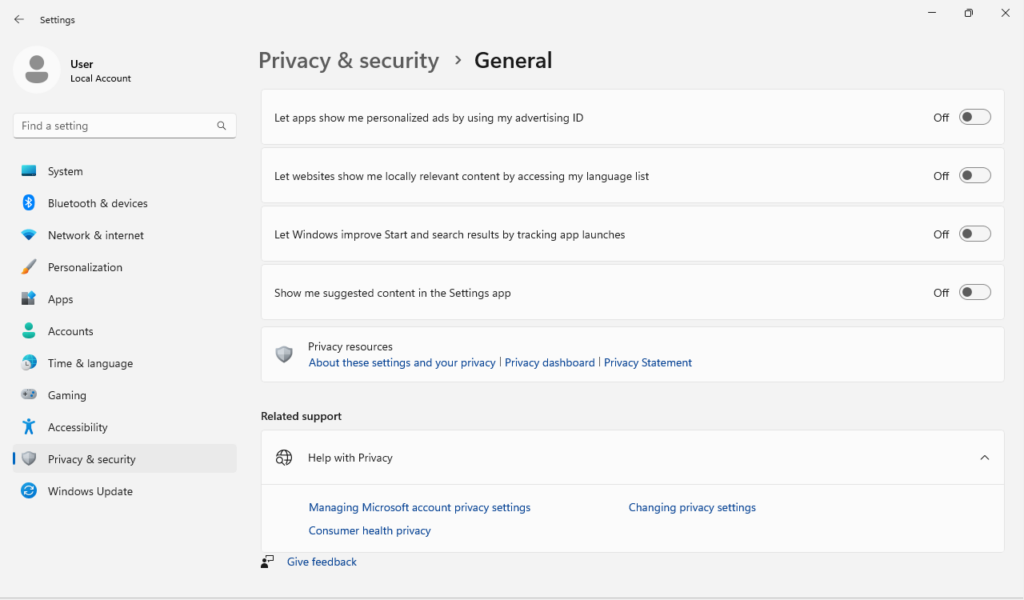
Disable Advertising ID and Personalized Ads
Finally, return to Privacy & security > General and turn off any feature you don’t need.
Limit Cortana’s Access to Personal Data
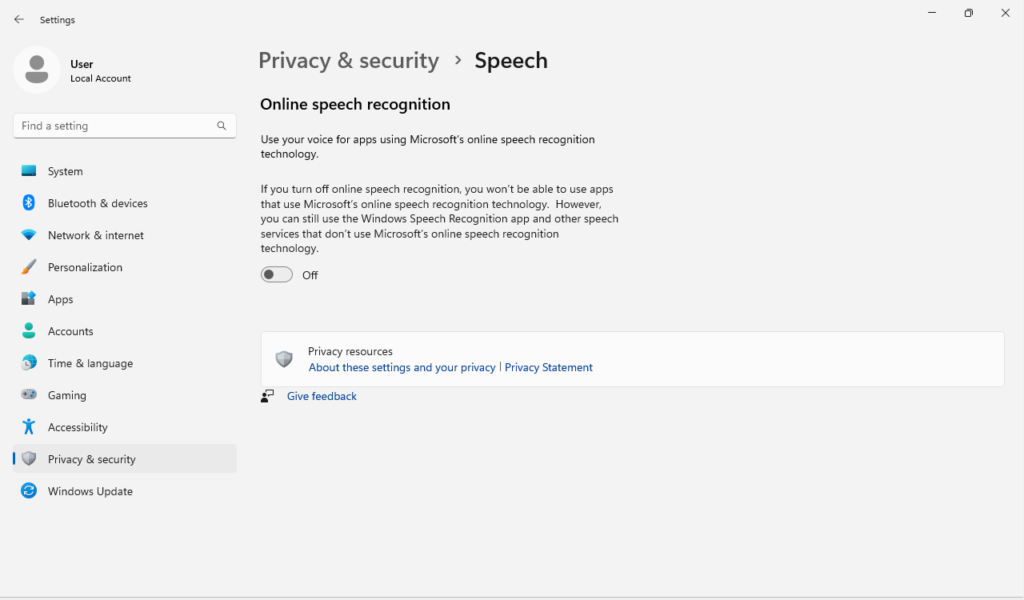
Limit Cortana’s access and turn off permissions for access to email, calendar, and contacts, if not necessary.
Press the Windows key + I to open Settings, then navigate to Privacy & security > Speech and disable the Online speech recognition feature.
Disable Timeline and Activity History
This prevents activity data from being stored or synced to your Microsoft account.
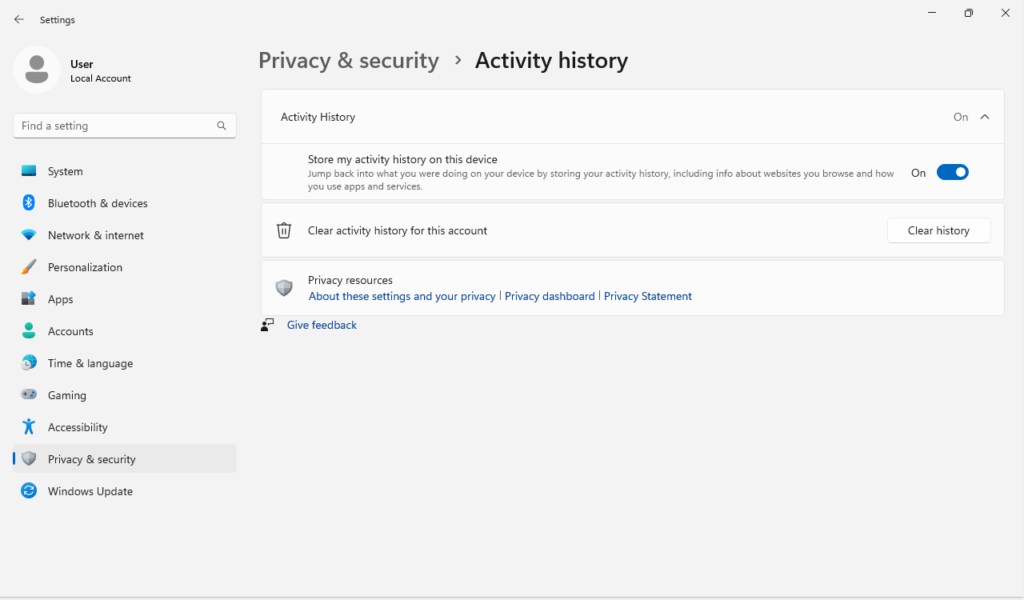
Press the Windows key + I to open Settings, navigate back to Settings > Privacy & security > Activity history and click the “Clear History” button to clear history. You can also disable “Store my activity history on this device” if you would like to disable it entirely.
Control File and Clipboard Access
Turn off file system access for applications that don’t need it, limiting access to your files and folders.
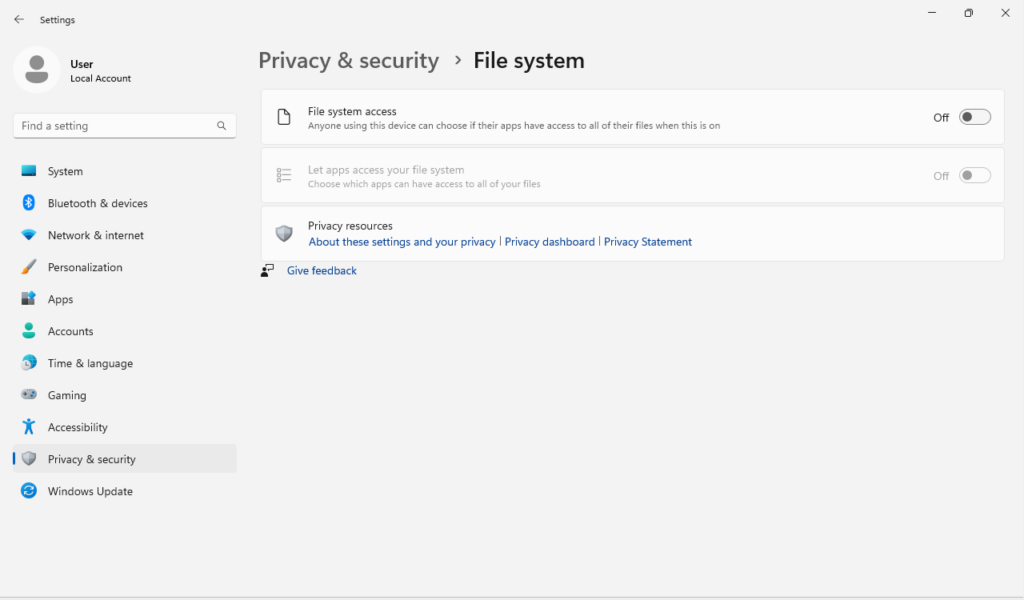
Press the Windows key + I to open Settings, navigate back to Settings > Privacy $ security > File system. Here you can restrict applications from accessing you file system. You can leave “Let apps access your file system” alone to manage access individually.
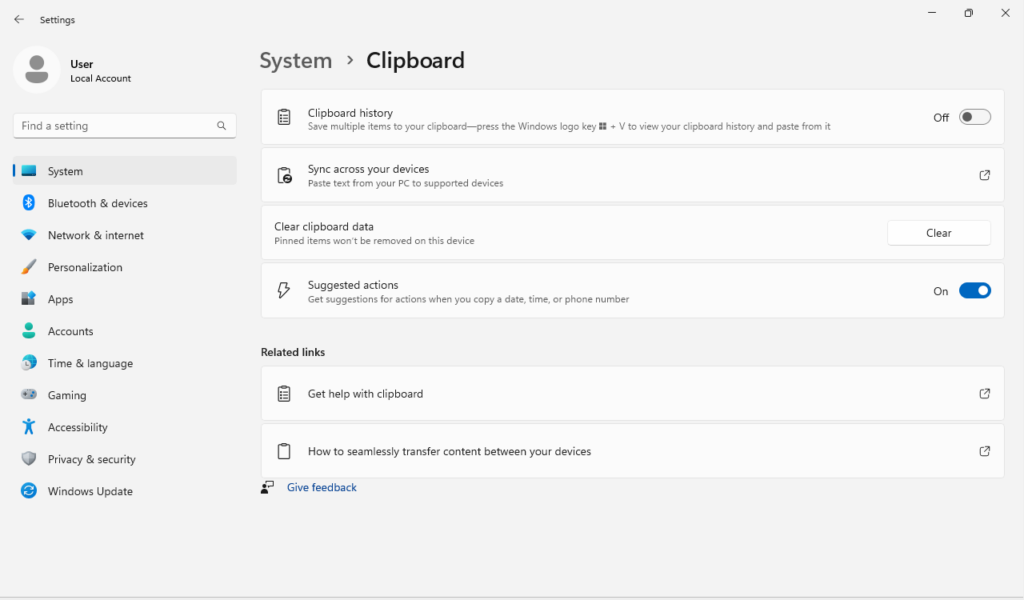
Now navigate back to System > Clipboard to edit the Clipboard history. Disable this feature to prevent clipboard history from being saved.
Use Privacy-Respecting Browsers and Search Engines
Use browsers like Firefox or Brave that offer more granular privacy controls and tracking protection
To enhance online privacy, use browsers like Firefox or Brave that provide advanced privacy controls and robust tracking protection features. These browsers limit data collection, block third-party trackers, and offer options to further customize your browsing security.
General Configurations
Disable or Remove Unused Software and Services
Minimize potential security risks by removing or disabling any unnecessary software or services
You can do this manually or by running my debloating script.
I wanted to go over that the goal of system hardening is reducing your attack surface. With this in mind, you must remove any applications you don’t need. This is similar to the windows and doors of your home. You wouldn’t install more windows and doors than you need, this would require more areas to secure and keep an eye on. The same goes for systems, if you don’t need the software just remove it entirely and remove any potential pivot point into your system from intruders.
Establish a Regular Backup Routine
Set up and adhere to a scheduled backup process to ensure data integrity and availability in case of an incident
I won’t go into depth on this one. Simply put, start a backup routine and stick to it! Whether you use the Windows backup utility or go for a third-party solution (there are many to choose from, I won’t even touch upon this subject here), find something you like and create a backup routine.
I personally like doing weekly full backups, but whatever your strategy is, try to retain at least 3 recent full copies of your backups. This way you have some built-in redundancy if one or more of your backups fail, offer some flexibility in choices of backup and balance between space and data protection.
Restrict Remote Access and Sharing Features
Disable Remote Desktop to prevent remote access to your system and turn off File and Printer Sharing to limit exposure from network-based attacks
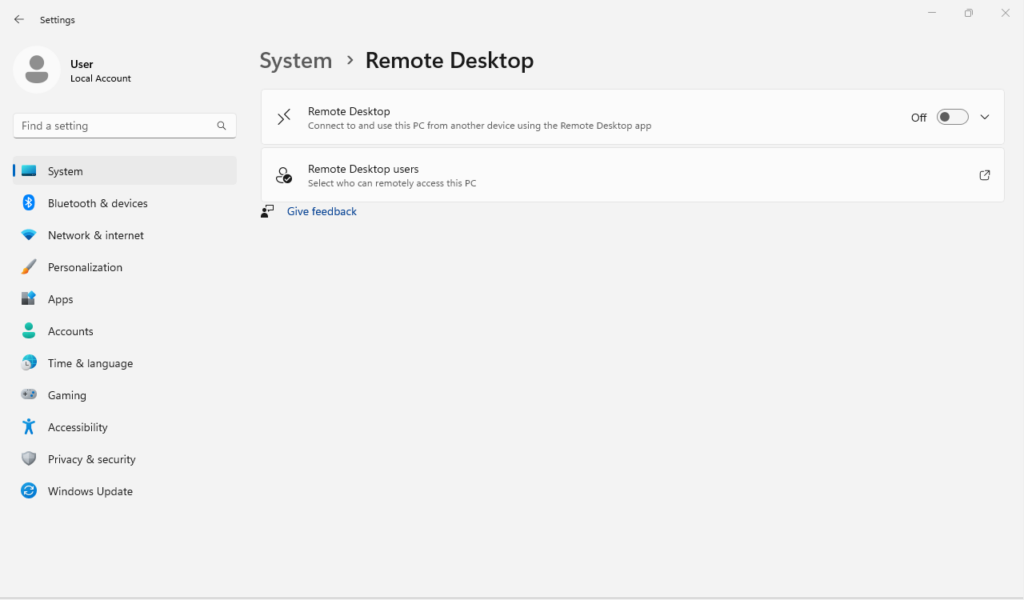
You can do this manually or by running my hardening script. If you choose to do this manually you can do so by pressing the Windows key + I to open Settings the navigate to System > Remote Desktop and disable RDP.
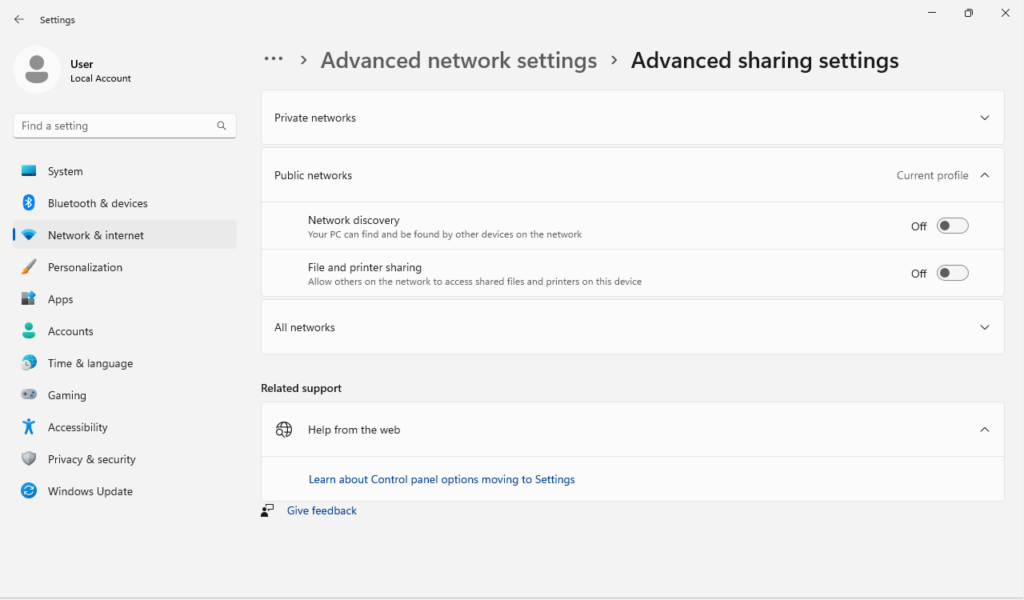
Then navigate to the Control Panel > Network and Internet > Network and Sharing Center > Change Advanced Sharing Settings and disable File and printer sharing.
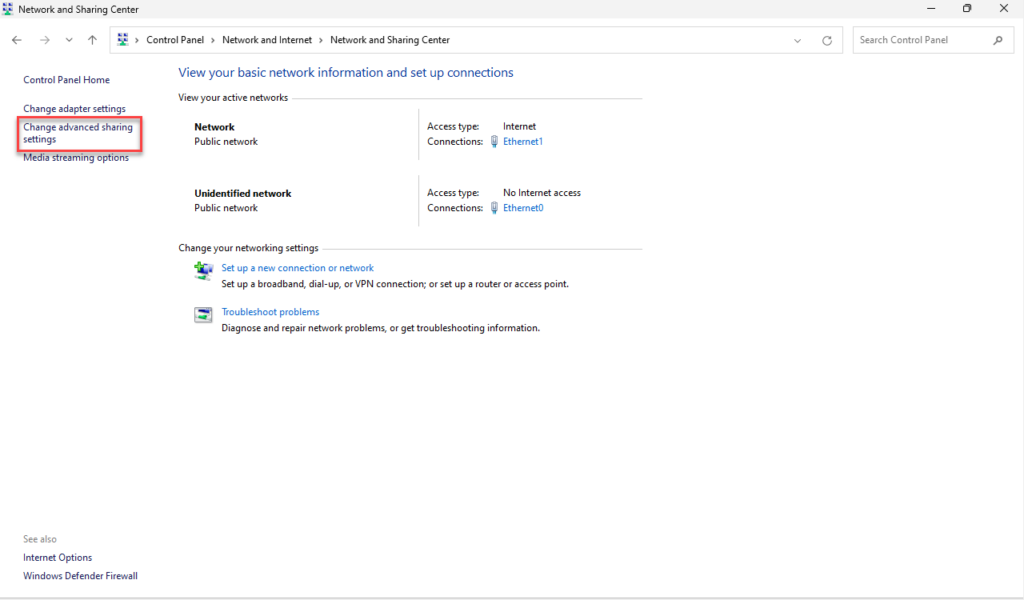
You can also navigate here through Windows key + I to open Settings the navigate to Network & internet > Advanced network settings > Advanced sharing settings.
Enable Secure Boot
In the BIOS/UEFI settings, enable Secure Boot to prevent unsigned or untrusted code from running during startup
This will vary by motherboard vendor. Follow your vendor instructions on how to enable Secure Boot.
Limit PowerShell and Command Line Access
Enable PowerShell Constrained Language Mode to limit the functionality of PowerShell scripts, which can reduce the risk of running malicious scripts and for Command Line Access, restrict its use in Local Group Policy Editor (gpedit.msc) under User Configuration > Administrative Templates > System
Open a new PowerShell window as an Administrator. Type the following:
$ExecutionContext.SessionState.LanguageMode
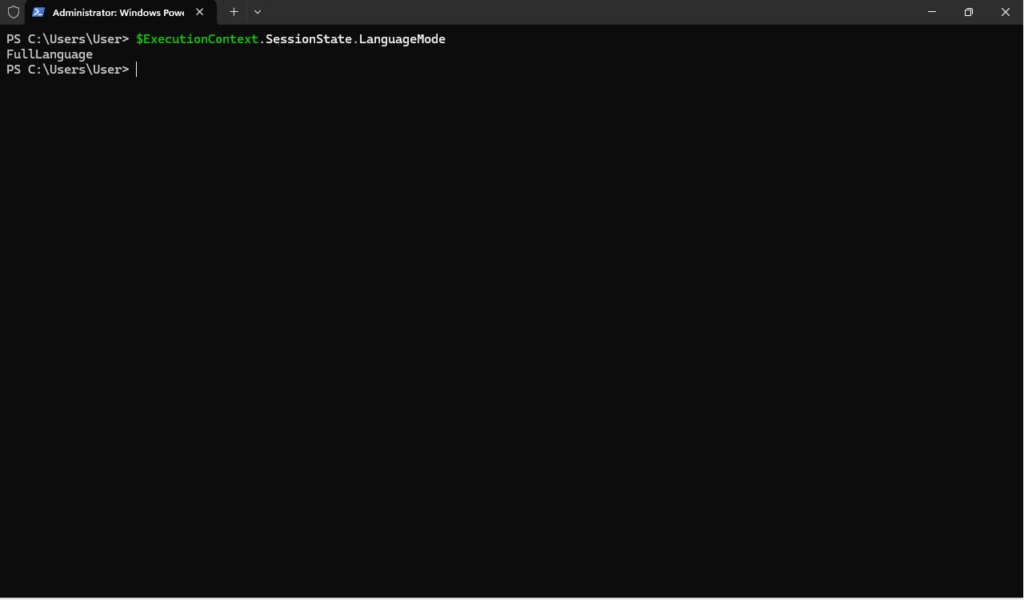
This will tell you what your current Language Mode is.
$ExecutionContext.SessionState.LanguageMode = "ConstrainedLanguage"
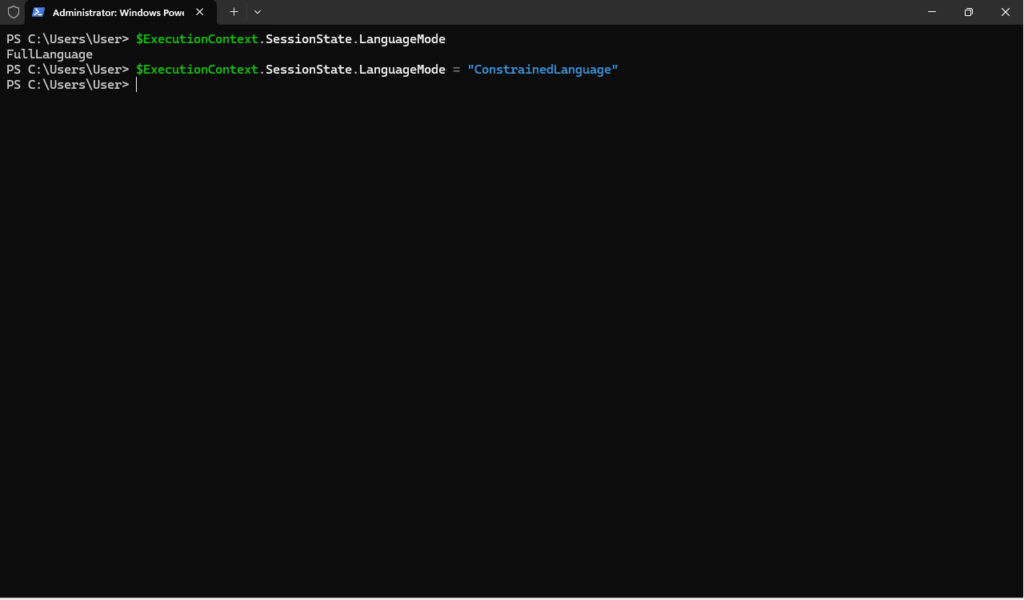
This will set your current Language Mode to “ContrainedLanguage”
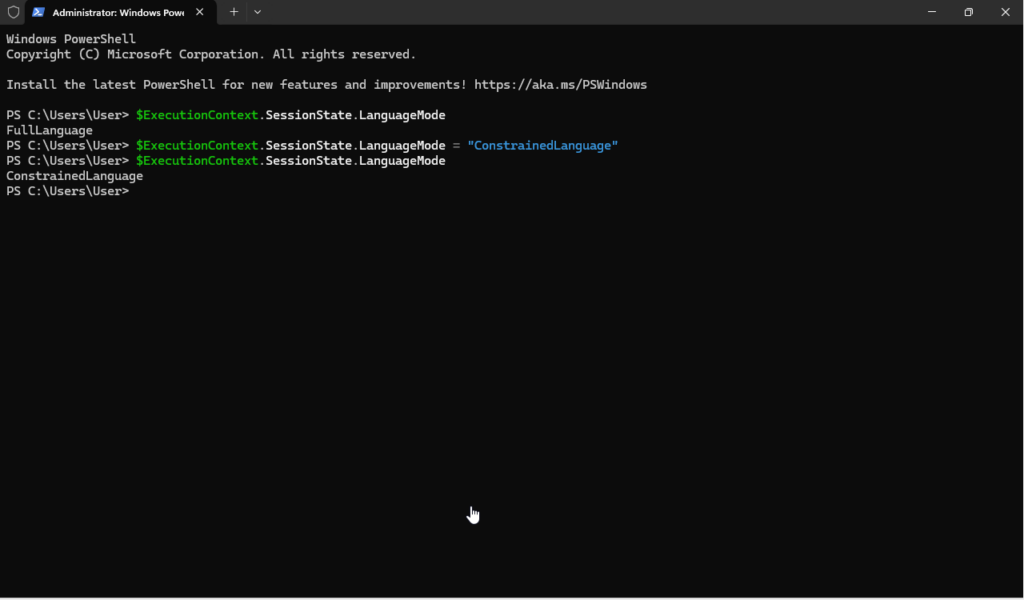
We can confirm by running the following command again:
$ExecutionContext.SessionState.LanguageMode
You can read more on Constrained Language mode on Microsoft’s PowerShell Constrained Language Mode page.
To restrict Command line access, press the Windows key + R to open the Run dialog then type “gpedit.msc” and navigate to User Configuration > Administrative Templates > System and double-click on “Prevent access to the command prompt” to edit the template.
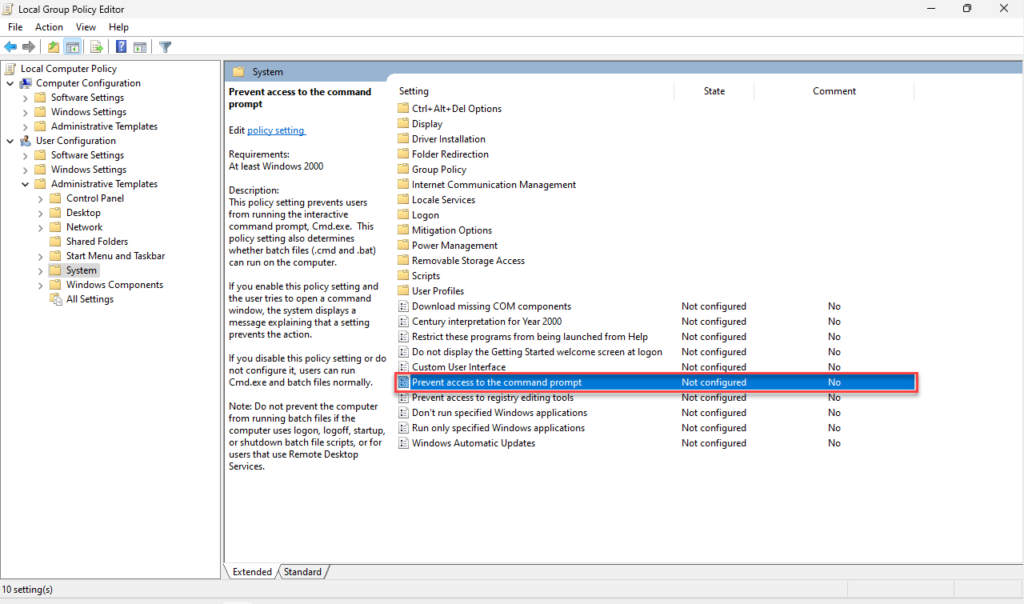
There is a whole lot to unpack here in the Local Group Policy Editor. You can make a variety of system changes. I suggest you check out Microsoft’s page on the Local Group Policy Editor for more information.
Scripts
As mentioned before I am including a couple scripts here:
Debloating Script: This script will remove any unnecessary Windows services and applications that come pre-loaded with Windows 11.
Hardening Script: This script makes various changes to the registry, so please backup your registry before running the script! Each line is commented to explain what is being changed in the registry.
Disclaimer – Please read the script carefully and understand what it does. I am not responsible for any adverse effects this may have on your system.

