

When you visit a website, what you see is just the surface. Beneath the buttons, forms, and menus is a constant stream of communication between your browser and the server, HTTP requests being sent, responses being received, data being exchanged. Understanding that communication is critical for identifying vulnerabilities, analyzing behavior, and testing the security of web applications.
That’s where Burp Suite comes in. Originally released in the early 2000s by security researcher Dafydd Stuttard, Burp Suite started as a simple intercepting proxy meant to help testers see and manipulate raw HTTP traffic. Stuttard, also one of the authors of The Web Application Hacker’s Handbook, went on to found PortSwigger, the company behind Burp Suite. Over the years, Burp Suite evolved from a lightweight tool into a full-featured platform for manual and semi-automated web application testing.
Today, Burp Suite is considered the industry standard for hands-on web application security work. It’s widely used by Penetration Testers, Bug Bounty Hunters, SOC Analysts, and Application SecurityProfessionals. Whether you’re poking at a login form or investigating a potential vulnerability in a web application, Burp Suite gives you complete visibility and control over the traffic between client and server.
In this post, I’ll walk through the core workflow for using Burp Suite to intercept and inspect web traffic. This includes configuring your browser to route traffic through Burp, capturing live requests, and analyzing how data flows between the client and server. While Burp offers a wide range of tools, we’ll focus on the essential features that demonstrate how real-world web communication works beneath the surface.
Let’s get started!
⚠ Disclaimer ⚠
This post is for educational and research purposes only. Burp Suite is a powerful security tool intended for use in penetration testing, red teaming, and secure development workflows. It must only be used in authorized environments and with explicit permission.
Any unauthorized use of Burp Suite may violate computer crime laws.
I assume no responsibility for any misuse or consequences resulting from the use of this information. It is the sole responsibility of the reader to ensure compliance with all applicable laws, organizational policies, and ethical guidelines.
Installation
Head over to the PortSwigger website and download the Community Edition. This free version includes the core tools we’ll be using:
- Proxy – to capture and view live HTTP/HTTPS requests
- Intruder – to automate customized attacks, such as brute-forcing usernames or passwords
- Repeater – to modify and resend individual requests for testing purposes
Once downloaded, install it like any standard application:
Windows: .exe installer
macOS: .dmg file
Linux: Java-based .sh script
No special configuration is required during installation, just run the installer and launch the application.
Starting a Project
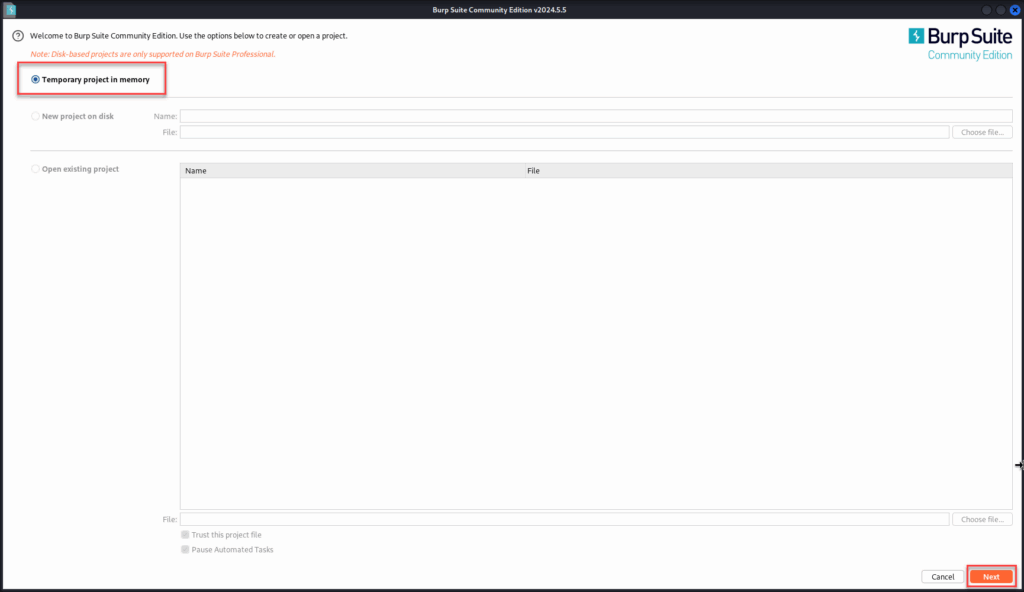
Once Burp Suite is installed, launch it and start a new Temporary Project. You don’t need to create a configuration file unless you’re doing advanced work, this is just for intercepting traffic.
Open Burp Suite > Select Temporary project in memory
Select Use Burp defaults > Click Start Burp
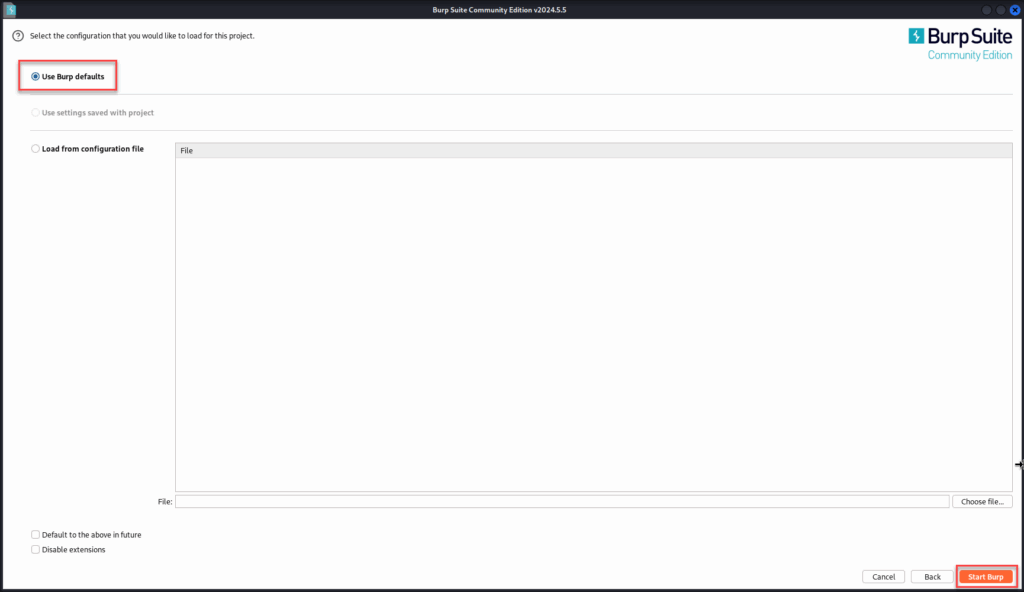
You’ll land on the main dashboard. From here, we’ll configure Burp to listen for browser traffic.
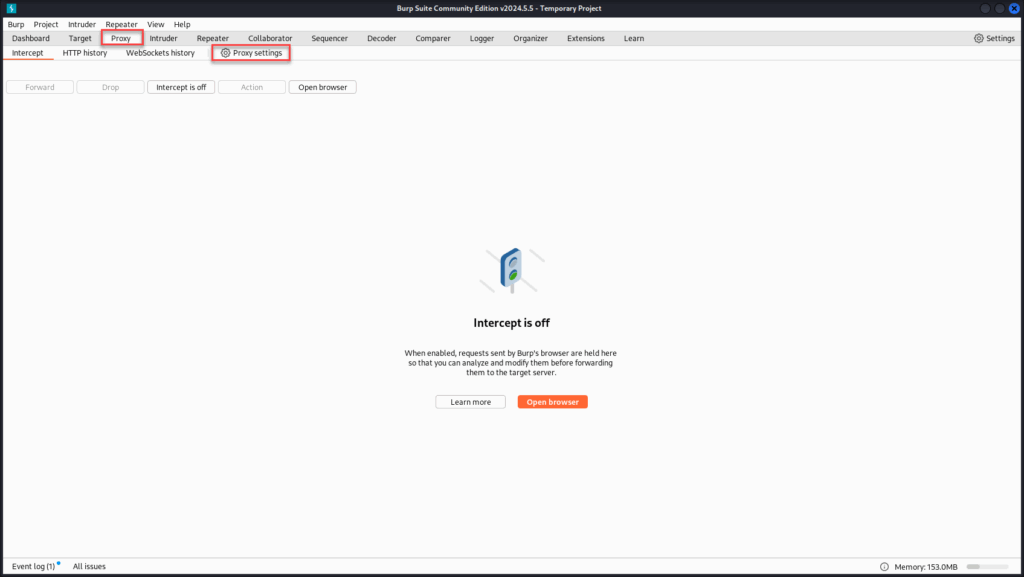
Configure the Proxy Listener
Burp Suite acts as a local proxy server. It listens for traffic sent from your browser, captures it, and allows you to view or modify it before it’s sent to the destination.
By default, Burp Suite listens on 127.0.0.1:8080, which means it’s already set up to receive traffic from your browser. No changes are needed unless you want to customize the setup. But, for whatever reason this is not configured you can do so by following these steps:
In Burp, go to the Proxy tab > Proxy settings.
Under Proxy Listeners, ensure there’s an entry for 127.0.0.1:8080, with a Per-host Certificate using Default TLS Protocols.
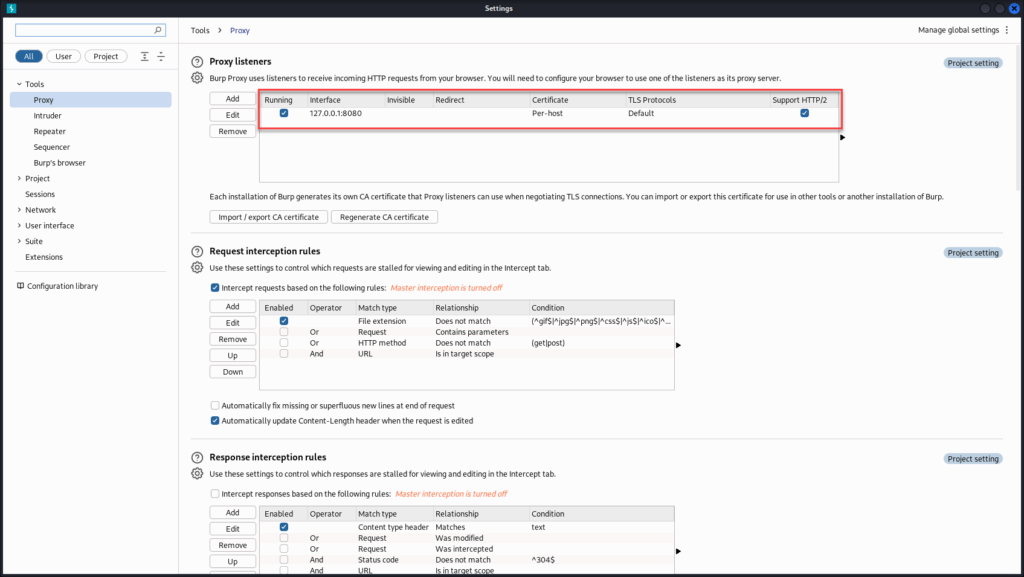
If it’s missing or disabled, click Add, enter 127.0.0.1 as the address and 8080 as the port, then check the “Running” box next to the entry.
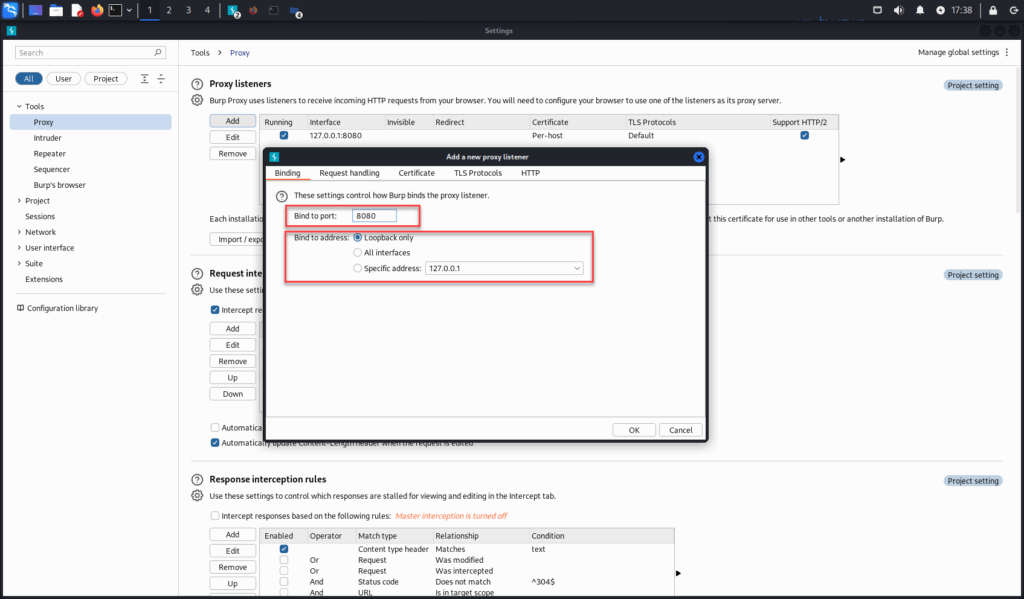
Once this is set, Burp is listening for traffic on localhost:8080.
Keep in mind this is a standard local setup. You’ll need to use the localhost IP address (127.0.0.1) unless you’re intercepting traffic from a remote system or mobile device. While you can choose any available port, 8080 is commonly used because it’s an alternate HTTP port and already set as the default in Burp. Whatever values you choose, IP and port, they must match exactly in FoxyProxy for interception to work correctly.
Configure Firefox with FoxyProxy
Instead of manually editing Firefox’s network settings, we’ll use the FoxyProxy browser extension to control when traffic is sent through Burp.
In Firefox, go to the FoxyProxy extension page > Click Add to Firefox, then Add. You’ll see the FoxyProxy icon appear in your toolbar.
Next we will have to add a Burp Proxy Profile. Click the FoxyProxy icon > Options. Click Add New Proxy. Under the Proxy Details tab, fill out the required information and click “Save”.
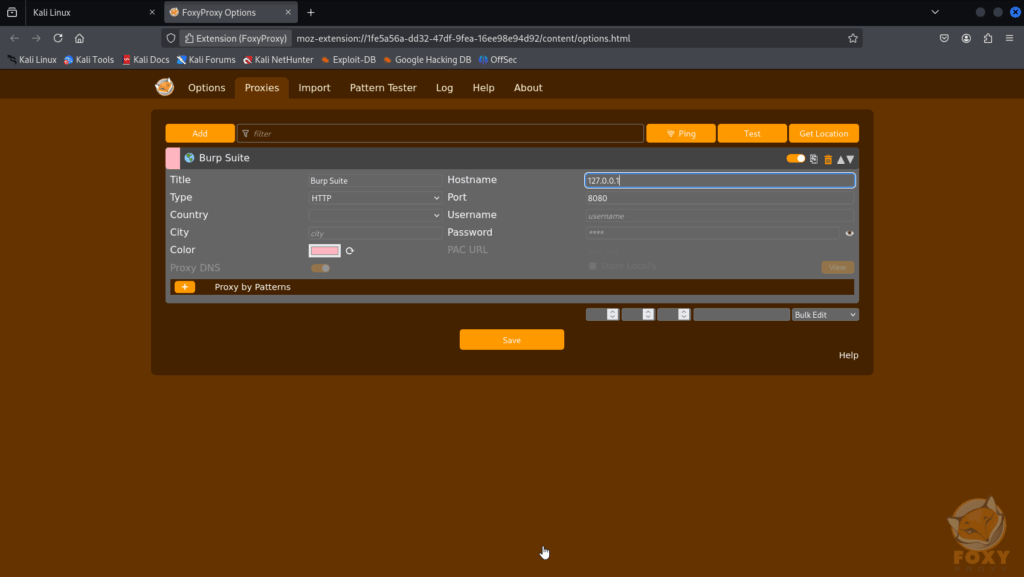
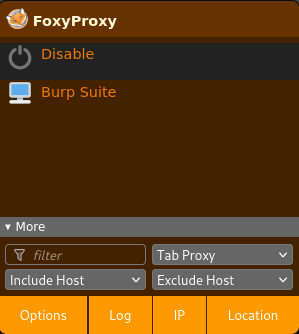
You can now toggle the proxy on or off with a click. To start intercepting traffic, click the FoxyProxy icon and select the Burp Suite profile.
Your browser traffic will now flow through Burp Suite. When you’re done testing, simply switch back to “Disable FoxyProxy” to restore normal browsing.
Installing Burp Suite’s Certificate
Most modern websites use HTTPS by default. Without trusting Burp’s certificate, your browser will block or break encrypted traffic, causing pages not to load, show connection errors, or display certificate warnings.
To fix this, we’ll install Burp Suite’s CA certificate into Firefox so it can safely decrypt HTTPS traffic during interception.
Make sure Burp Suite is running, In Firefox (with FoxyProxy still enabled), visit:
http://burp
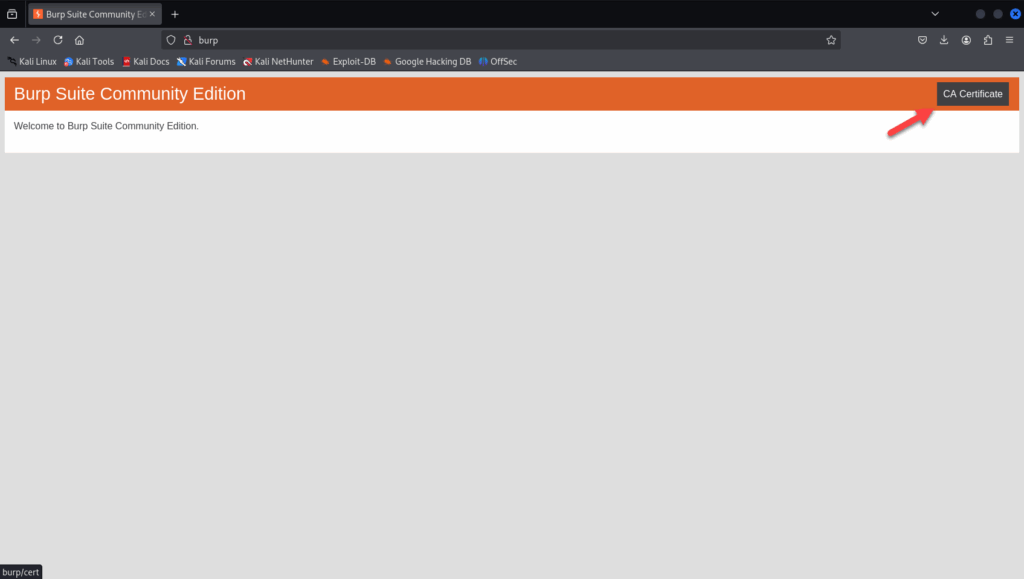
Yes, it’s just http://burp, Burp intercepts and serves a local certificate page. Click “CA Certificate”. This will download a file named cacert.der.
Now we have to import our certificate file into Firefox. In Firefox, go to, Settings > search for “Certificates”. Click View Certificates.
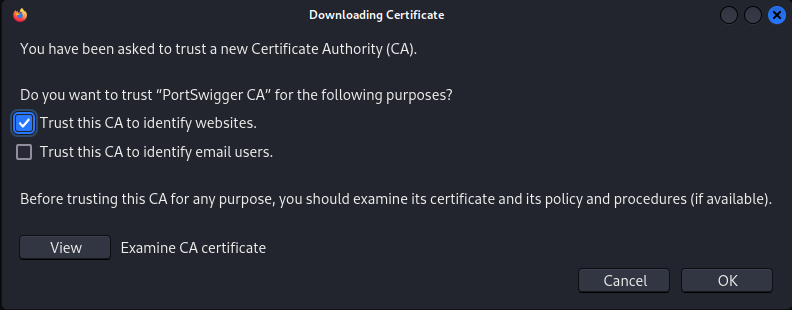
In the Authorities tab, click Import. Select the downloaded cacert.der file.
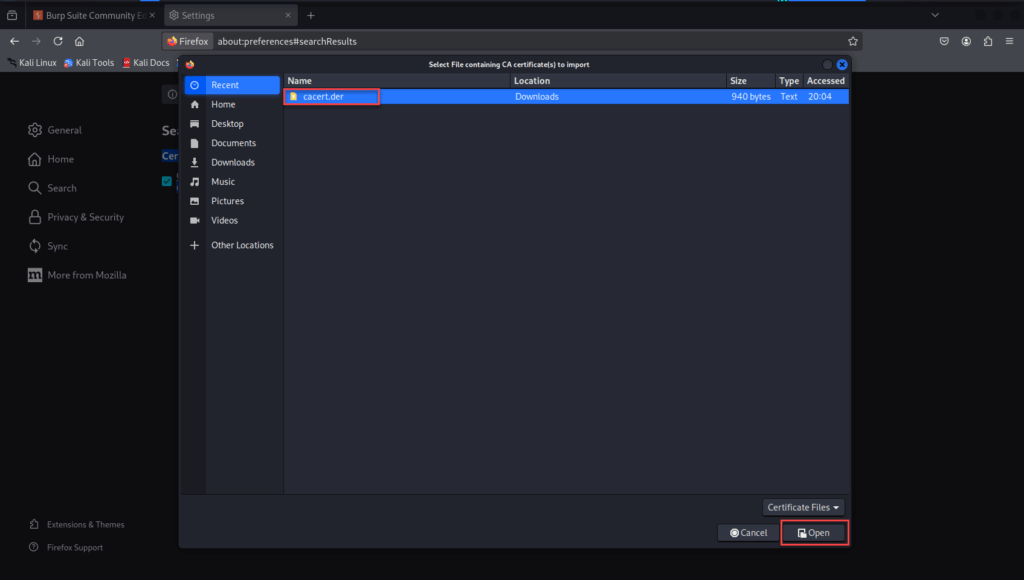
Check: “Trust this CA to identify websites”. Click OK and close the certificate manager.
Now restart Firefox to have the changes take effect.
Intercepting Web Traffic
For this demonstration, we’ll be exploring the “Username enumeration via different responses” lab from PortSwigger Academy.
PortSwigger’s Web Security Academy is an excellent (and free!) platform for sharpening your web security skills. It offers a wide range of hands-on labs across various difficulty levels, all accessible with just a free account. If you haven’t signed up yet, now’s a great time to!
The landing page provides a brief overview of the lab along with a official solution and some community solution links (no peeking!).
What we’re after is a solid understanding of the challenge itself, in this case, a username enumeration vulnerability paired with password brute-forcing. The description also points us to the required username and password wordlists, which we’ll use in our attack.
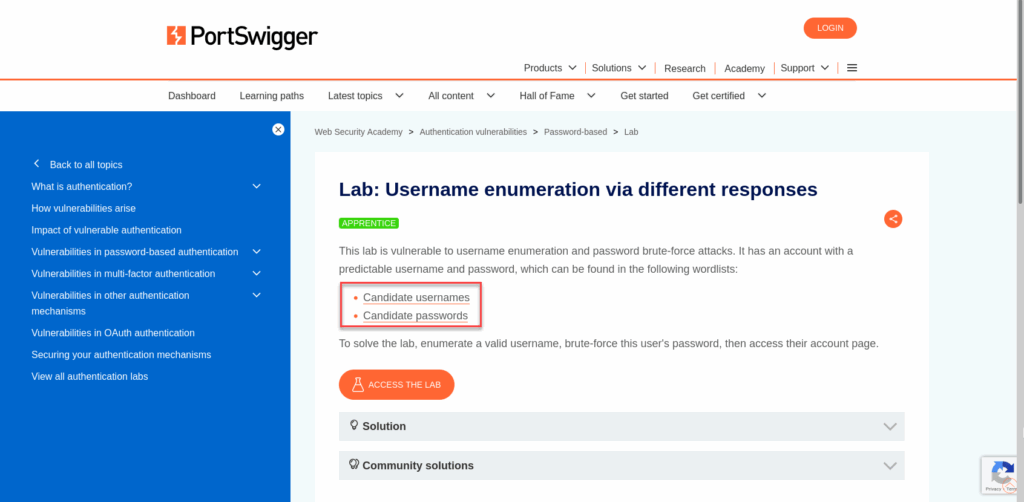
Take note of the provided username and password lists, you can open them in a new tab or save them to a text file. Either way, we’ll need them shortly when we launch our attack.
Once the lab launches, we’re greeted with what appears to be a standard blog layout, complete with a “My account” link in the upper-right corner.
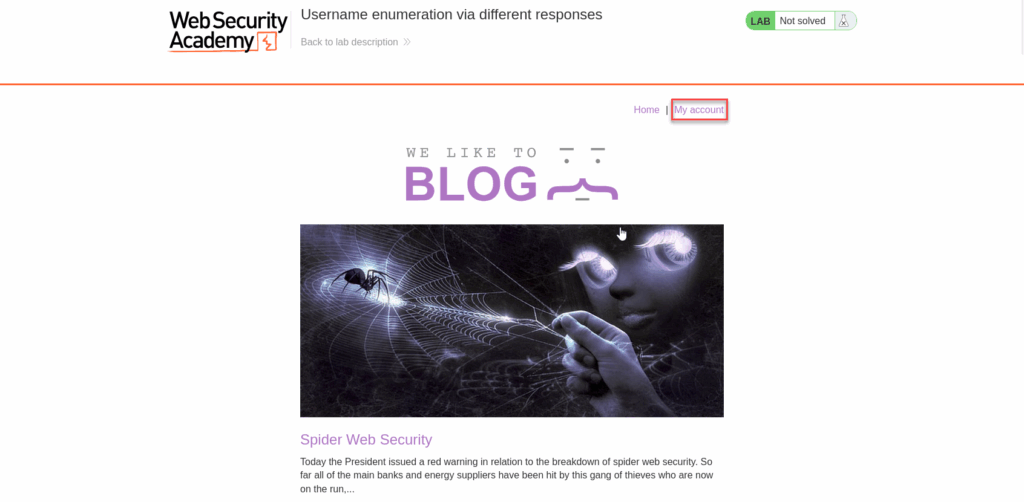
A quick scroll through the blog doesn’t reveal anything noteworthy beyond the posts themselves. Since we know this challenge involves username and password authentication, let’s head straight to the login page and get started.
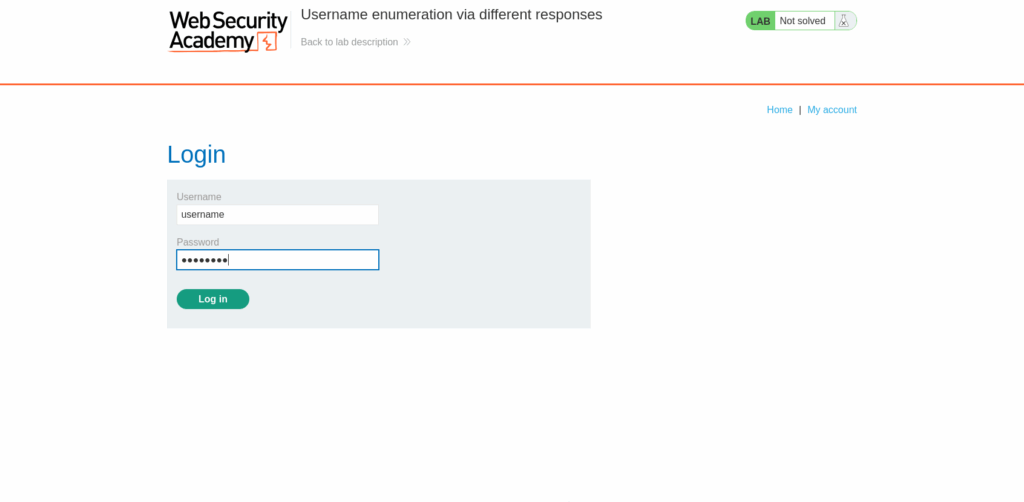
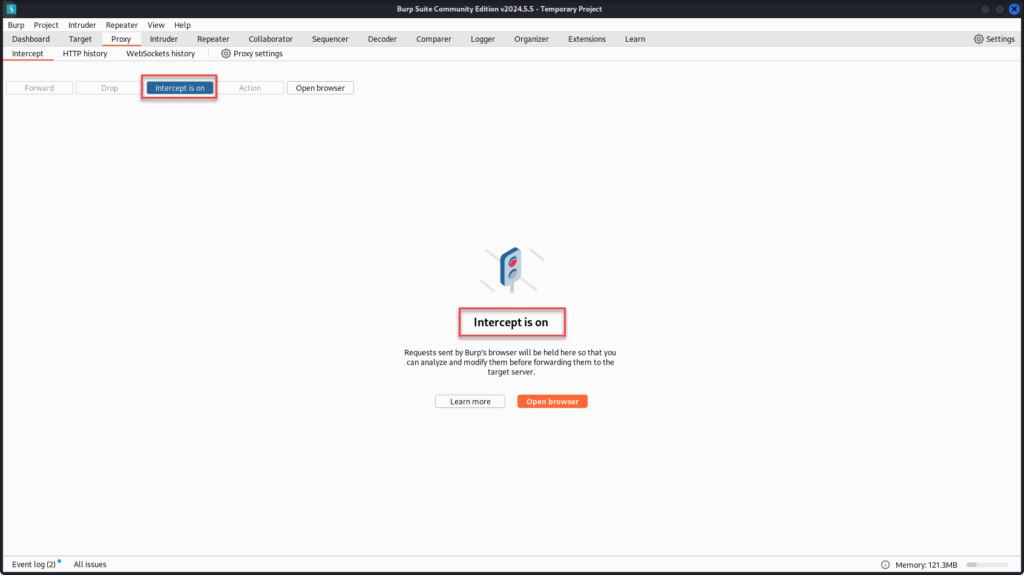
Clicking the “My account” link takes us directly to the login page. At this point, make sure FoxyProxy is enabled in your browser and that Burp Suite’s intercept is set to “on”, this ensures we can capture and inspect the login request as it’s sent.
Let’s test the login form by entering some bogus credentials in both the username and password fields, then clicking “Login.”
Burp Suite should intercept the request, once it does, send it to Repeater, click “Send”, and examine the server’s response. This gives us a baseline for how the application handles invalid login attempts.

Inspecting the response in Repeater, we can see a message like “Invalid username,” indicating that the application checks the username first before validating the password.
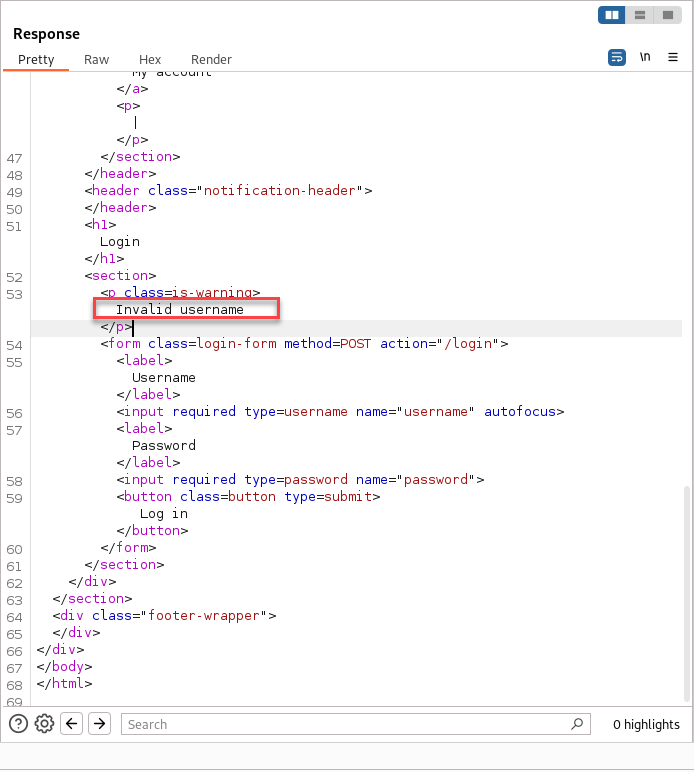
At this stage, there’s no feedback about the password itself, suggesting that the login logic verifies the existence of the username before even attempting to check the password. This behavior is exactly what allows for username enumeration based on response differences.
Now that we understand how the server responds to invalid usernames, let’s go back to the Proxy tab, right-click the intercepted login request, and choose “Send to Intruder.”
In the Intruder tab, we’ll configure our attack by highlighting the value of the username parameter and clicking “Add §” to mark it as a payload position. This tells Burp to iterate through our username list at that spot. Leave the password field static for now, we’re focusing on identifying a valid username first.
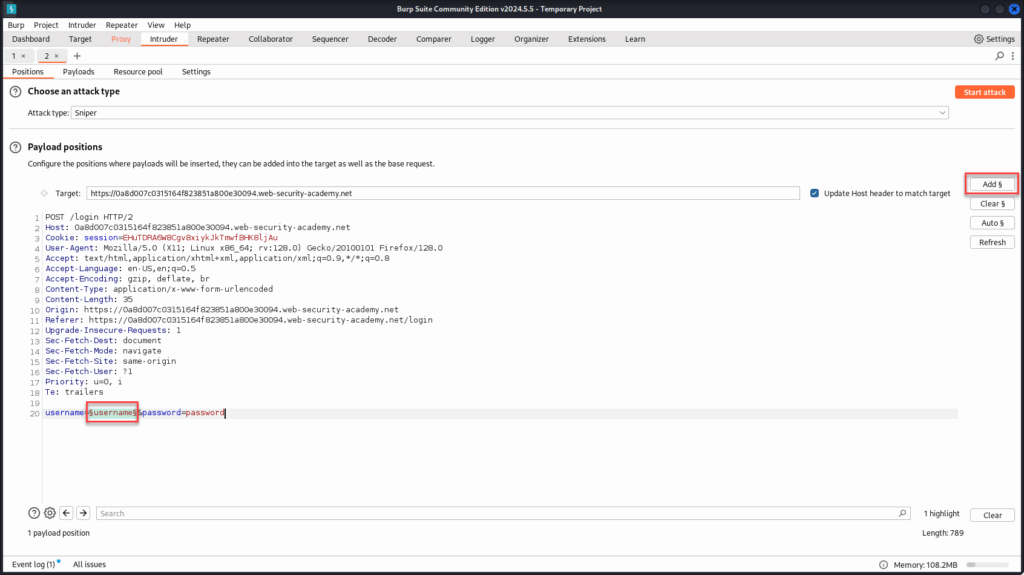
Be sure to select the correct field when setting your payload position, this step is crucial. If you accidentally highlight the wrong part of the request, just click “Clear §” to reset and try again. Precision here ensures Burp targets the right parameter during the attack.
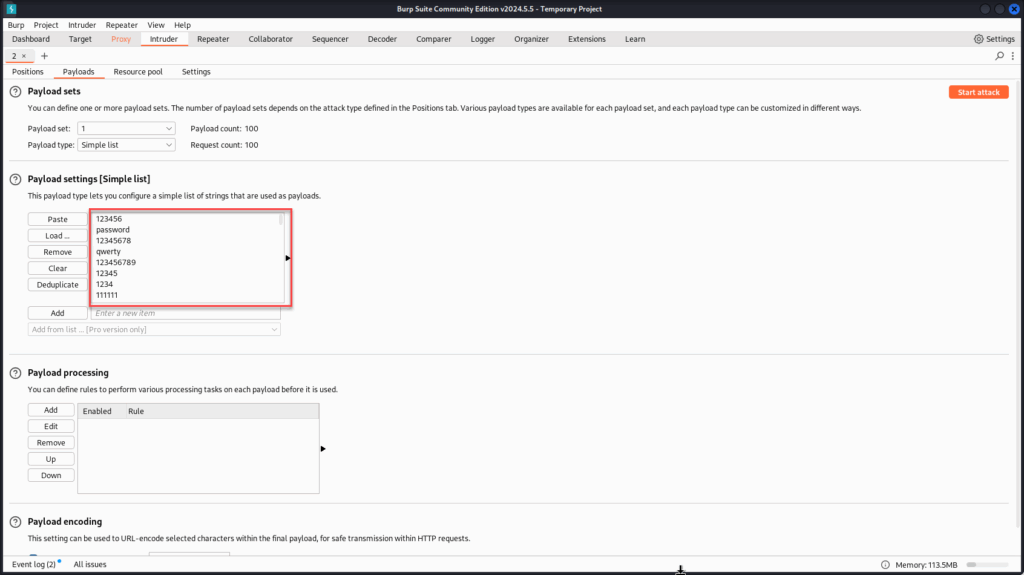
With the payload position set, switch over to the “Payloads” tab. Here, you’ll paste in the username list provided at the start of the lab. This list will be used to cycle through different values in the username parameter as Burp attempts each one in sequence.
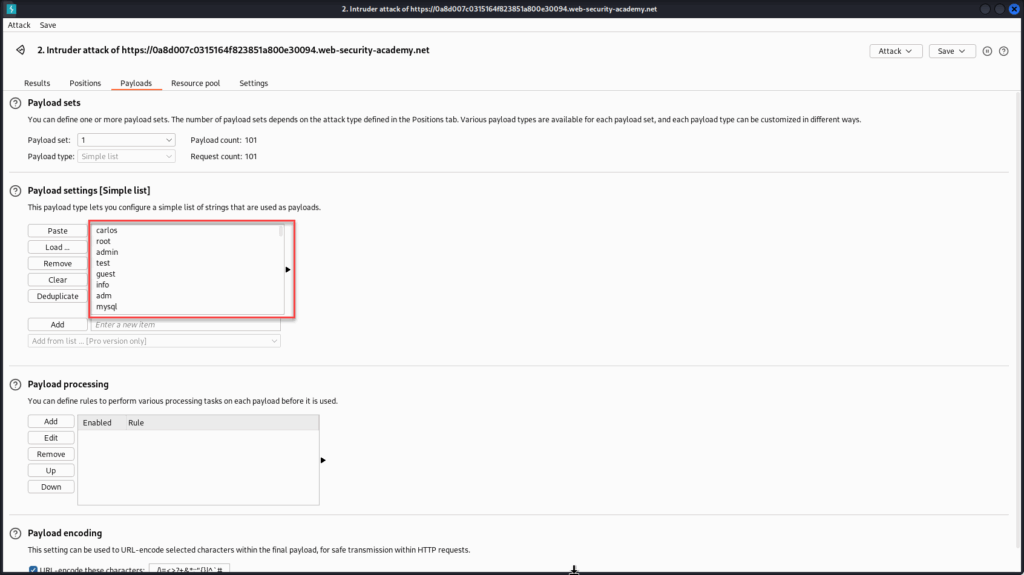
Once your payload list is loaded, click “Start attack” and watch the results come in. Burp will cycle through each username, sending a request for each one and capturing the response, giving us everything we need to identify differences in behavior.
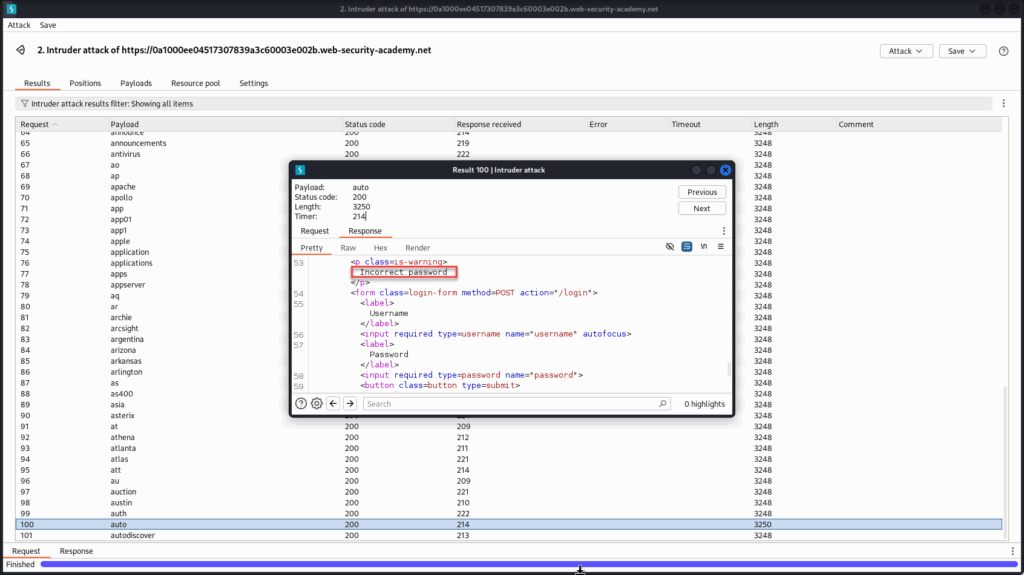
Around request #100, we notice a response with a different length, a strong indicator that something changed in the server’s behavior. This suggests we may have found a valid username, as the application is now likely moving past the username check and evaluating the password field.
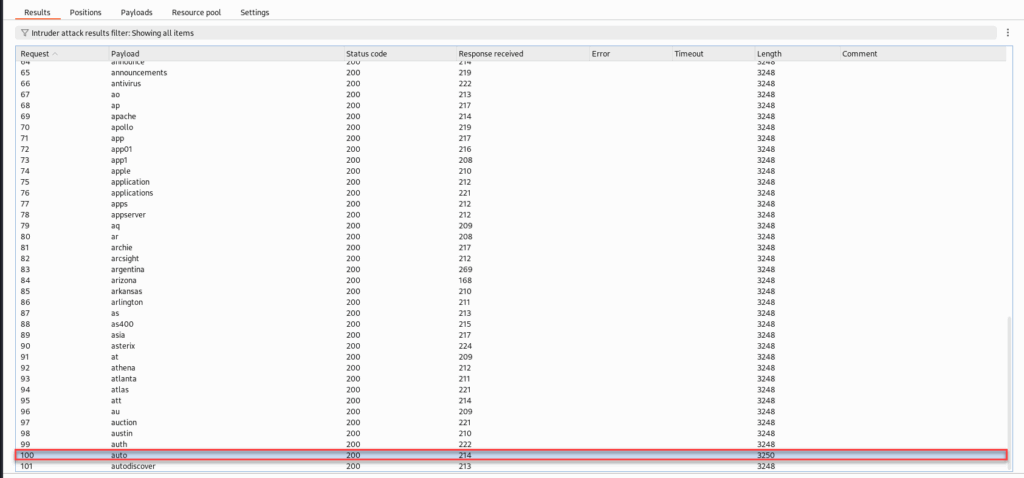
Inspecting the response for this request, we no longer see the “Invalid username” message. Instead, the server returns “Incorrect password”, a clear sign that the username exists and the application has progressed to validating the password.
Now that we’ve identified auto as a valid username, we can lock it in as a static value. With the username field set to auto, we’ll configure a new Intruder attack, this time targeting the password parameter, to begin brute-forcing the correct password for this account.
First, remove the payload marker from the username field and replace it with the static value auto. Next, highlight the value of the password parameter and click “Add §” to set it as the new payload position. This tells Burp to iterate through our password list while keeping the username fixed.
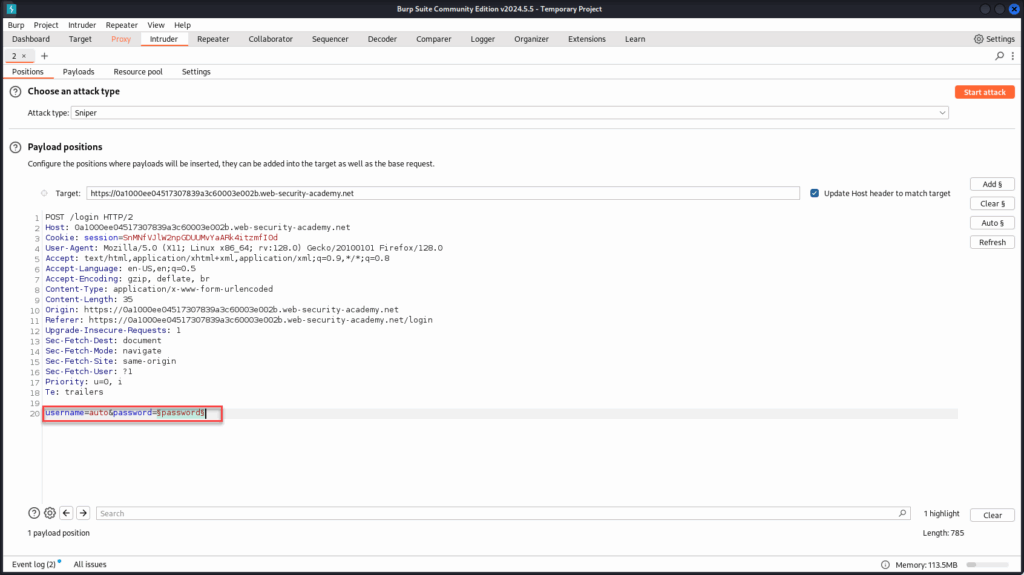
With the payload position set on the password field and the static username in place, head over to the “Payloads” tab.
Paste in the provided password list, Burp will now use this to attempt each password against the known valid user.
With the password list loaded, click “Start attack” and let Burp do its work. As the responses come in, keep an eye out for differences in status codes or response lengths, these often signal a successful login.
Around request #41, we notice a 302 Found response along with a significantly smaller content length compared to the others.
This kind of redirect is commonly associated with successful logins, as the application forwards the authenticated user to their account dashboard.
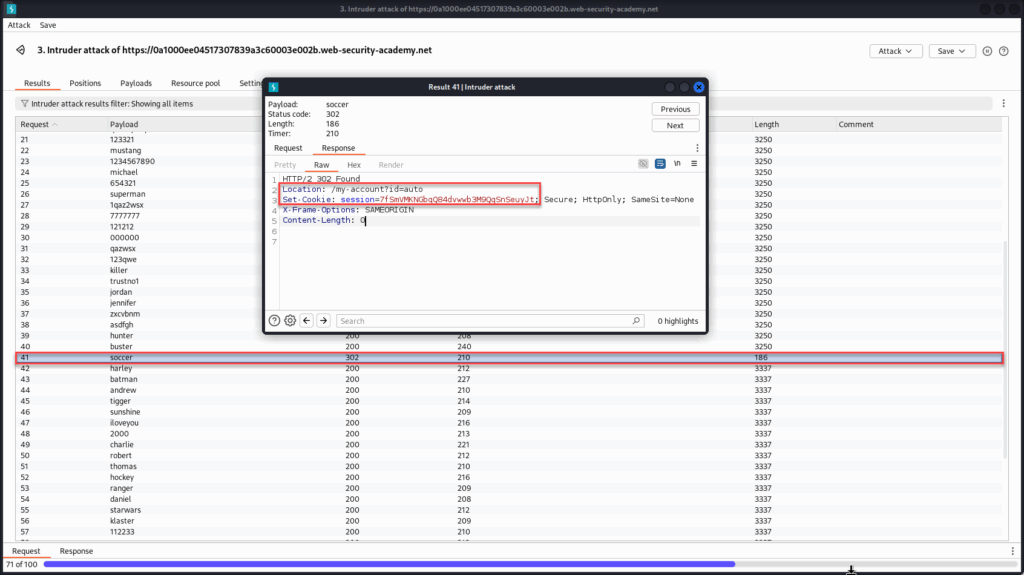
To confirm, we can inspect the response headers, we’ll likely see a Location header pointing to a path like /my-account and a Set-Cookie indicating a valid session token.
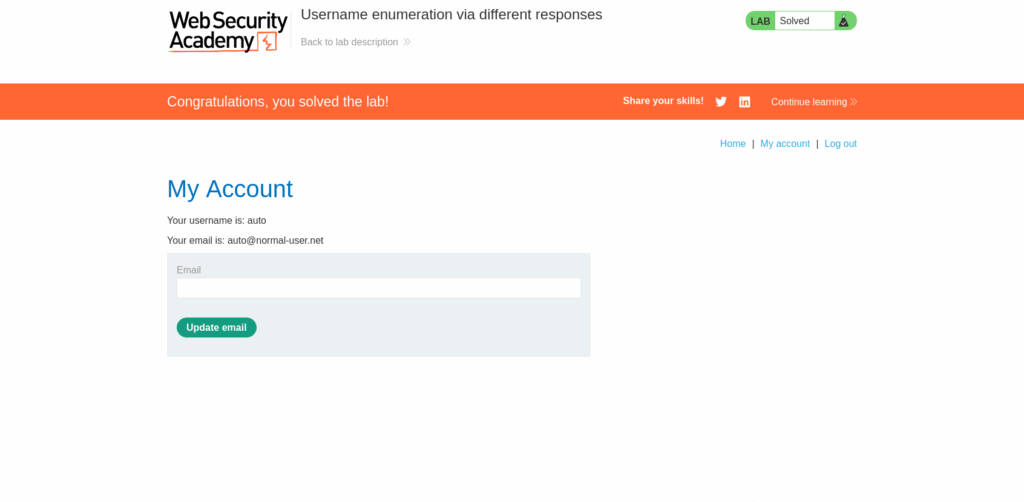
And that’s it! We’ve successfully enumerated a valid username and brute-forced the correct password using Burp Suite! We can try logging into the account using our browser to confirm.
Conclusion
This post demonstrates how powerful Burp Suite can be for analyzing and manipulating web traffic in real time. By walking through a practical lab on username enumeration and password brute-forcing, we explored how differences in server responses can reveal vulnerabilities and how Burp’s tools like Proxy, Repeater, and Intruder allow us to exploit them in a controlled, ethical setting.
Understanding how HTTP requests and responses work beneath the surface is fundamental to web application security. Tools like Burp Suite don’t just help us uncover flaws, they deepen our insight into how web applications behave, how developers structure authentication, and where things can go wrong.
Whether you’re a beginner just getting started or a seasoned analyst sharpening your skills, Burp Suite offers an essential platform for learning, experimentation, and real-world testing.
If you enjoyed this walkthrough, keep exploring the PortSwigger Web Security Academy. There’s a full library of labs covering everything from XSS and SQL injection to advanced authentication bypasses and business logic flaws, all for free!
Until next time, folks!