Fail2Ban was first created back in October 2004 by Cyril Jaquier as an intrusion prevention software framework. Written in Python, it focuses on monitoring application-level logs and patterns of activity to detect and respond to specific security threats, such as brute-force attacks. It is important to understand that Fail2Ban is not an IPS, but rather log-based intrusion prevention system. Unlike a traditional IPS, Fail2Ban works by monitoring logs and then dynamically updating firewall rules to block the offending IP addresses. It does not perform deep packet inspection or operate at the network level like a traditional IPS.
Fail2Ban works under the premise of “jails”, where offending IPs live until they meet the criteria to be released. These jails are governed by rules that you can set under specific parameters. Let’s take a look at some rules that we can implement.
First, lets get Fail2Ban installed and take a look at the install directory:
sudo apt install fail2ban
sudo systemctl enable fail2ban
Now that we have Fail2Ban installed and enabled to run at startup, let’s take a look at what the directory structure looks like:
cd /etc/fail2ban
ls -la
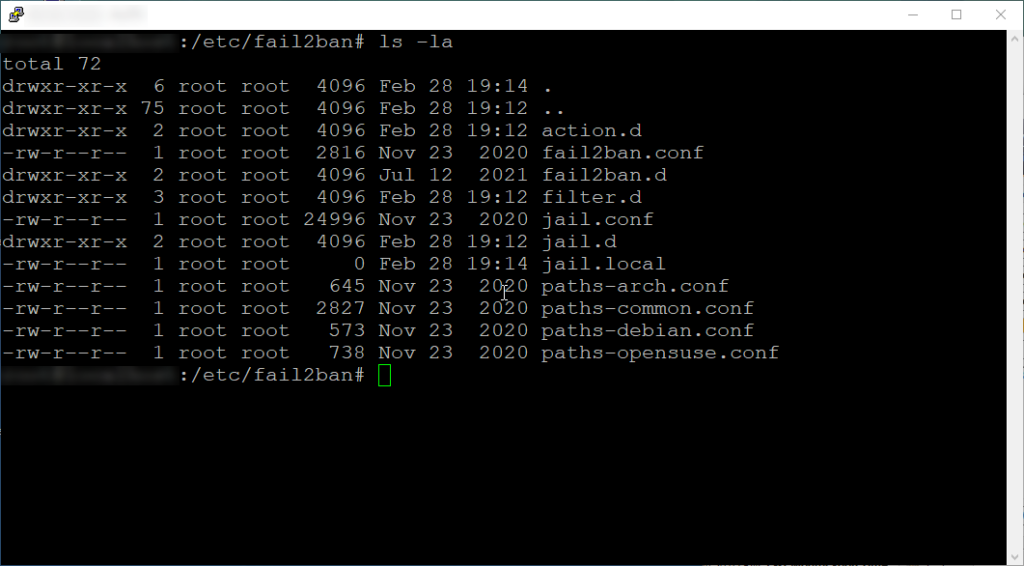
I’m not going to go through everything here, but lets do an overview.
Main Directory (/etc/fail2ban)
fail2ban.conf – This is the main configuration file for Fail2Ban. It includes global settings such as log file paths, socket paths, and other options.
jail.conf – This file contains the default jail configurations. You can use this file as a template to create custom jail configurations. However, it’s recommended not to modify this file directly. Instead, you should create a separate file for your custom configurations (i.e. jail.local).
jail.local – This file is used to override or supplement the default settings provided in jail.conf. It’s where administrators can define custom jails and modify existing configurations without directly editing jail.conf (which could be overwritten during package upgrades).
Subdirectories
/etc/fail2ban/action.d/ – This directory contains configuration files for various actions that Fail2Ban can take when a rule is triggered. Actions include banning IP addresses, sending email notifications, executing scripts, etc. Each file in this directory corresponds to a specific action that Fail2Ban can perform.
/etc/fail2ban/filter.d/ – This directory contains filter configuration files, which define patterns that Fail2Ban uses to detect malicious activity in log files. Each file typically corresponds to a specific service or application (such as sshd.conf for SSH service). Filters define regex patterns (regular expressions or patterns used to match strings or sequence characters within text) to match relevant log entries.
/etc/fail2ban/jail.d/ – This directory contains individual jail configuration files. As mentioned before, jails define specific rules and actions for protecting services against attacks. It’s recommended to create custom jail configurations in separate files within this directory, rather than modifying the default jail.conf directly.
Logging
/var/log/fail2ban.log – Fail2Ban logs various activities and events to this directory. The main log file is usually fail2ban.log, which records general Fail2Ban activity. Additionally, each jail may have its own log file named after the jail.
Other
/var/lib/fail2ban/ – This directory contains Fail2Ban’s persistent data, including banned IP addresses and other state information.
/usr/share/doc/fail2ban/ – This directory contains documentation and example configurations for Fail2Ban.
Now that we have an idea of how Fail2Ban is configured and managed, let’s make a basic rule to block SSH attempts.
sudo vim /etc/fail2ban/jail.local
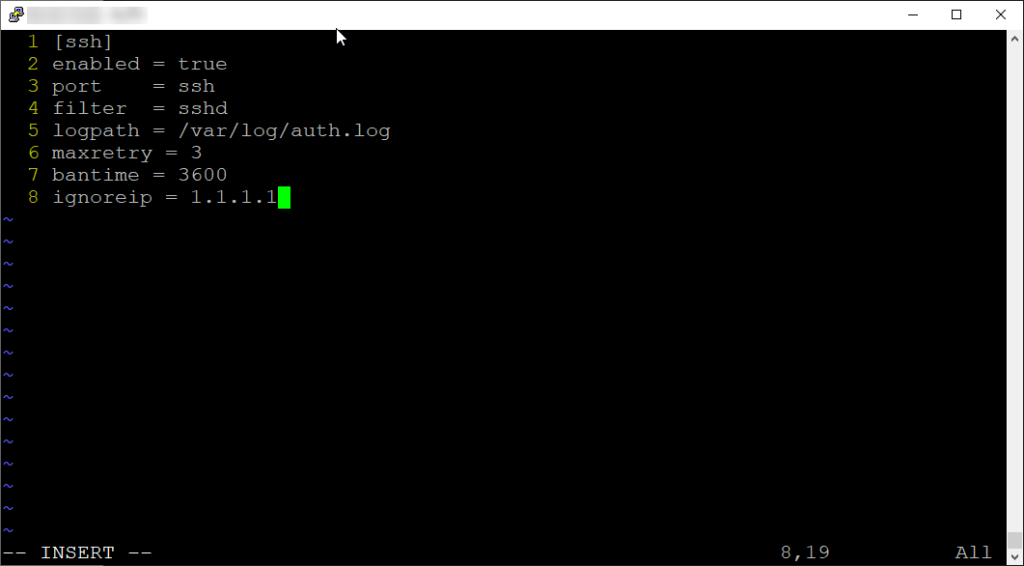
Remember, the jail.local file will override settings in the jail.conf file and the jail.d directory. The syntax we will follow for jail configurations is listed above.
This is pretty straightforward, you must enable the rule to have it apply the settings. Provide port information, here I just specified “ssh”, but you should use a port number (this is particularly important if your SSH service is configured to run on a non-standard port.). Then the filter parameter that specifies the name of the filter configuration file that contains the regex patterns to match relevant log entries. Of course you would need a log path for Fail2Ban to scan, this will vary depending on your distribution. Then we have the allowed login attempts and the ban time in seconds. I also like to add whitelisted IPs, so this way administrators can avoid being accidently locked out.
Write and save the file. Then we must restart the Fail2Ban service to apply this new rule.
sudo systemctl restart fail2ban
Now if you attempt to exceed the configured login allowance with an IP outside of the whitelisted IPs, Fail2Ban will recognize those entries and take the appropriate action set by the rule. You can view the logs live as you are testing by using the following command:
tail -f /var/log/fail2ban.log
So this is a pretty basic rule, let’s spice things up a bit. I created a rule that protects an Apache web server by blocking IP adddresses that generate excessive 404 errors.
For this we need to create a custom filter in the /etc/fail2ban/filter.d directory mentioned earlier.
sudo vim /etc/fail2ban/filter.d/apache-404.conf
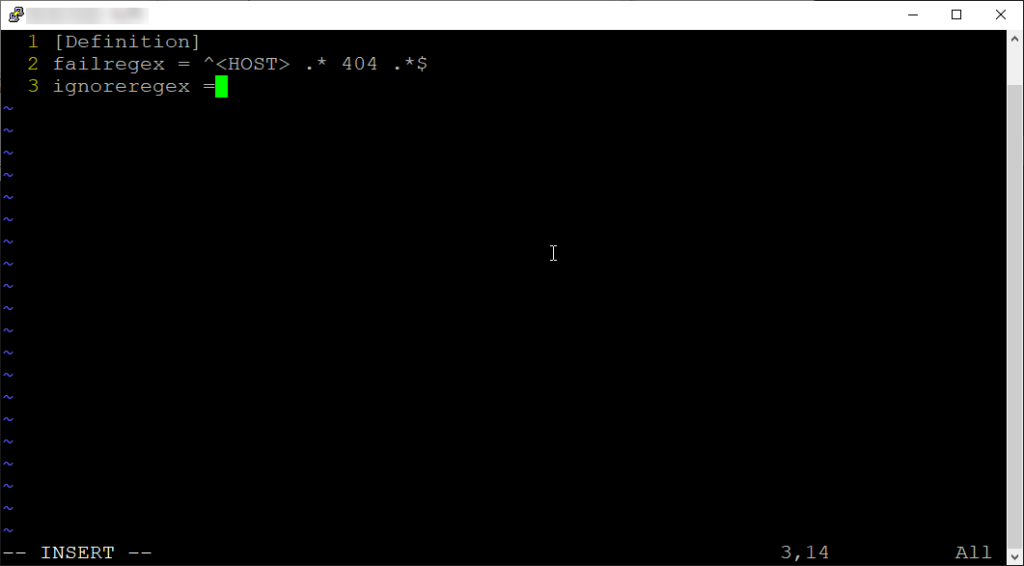
Here’s the breakdown:
[Definition] – This indicates the start of a new section in the Fail2Ban filter configuration file. It defines parameters for our custom filter apache-404.
failregex = ^ .* 404 .*$ – This line defines a regular expression pattern that Fail2Ban will use to match log entries in Apache access logs. It will match log entries containing an IP address followed by “404” in the access logs.
ignoreregex = – This line specifies any regular expressions that Fail2Ban should ignore when processing log entries. In this case, it’s empty, indicating that there are no patterns to ignore.
This filter will match Apache log lines with a 404 status code and extract the IP address of the client. Write, save and exit.
Now onto the rule itself, let’s go back to our jail.local file:
sudo vim /etc/fail2ban/jail.local
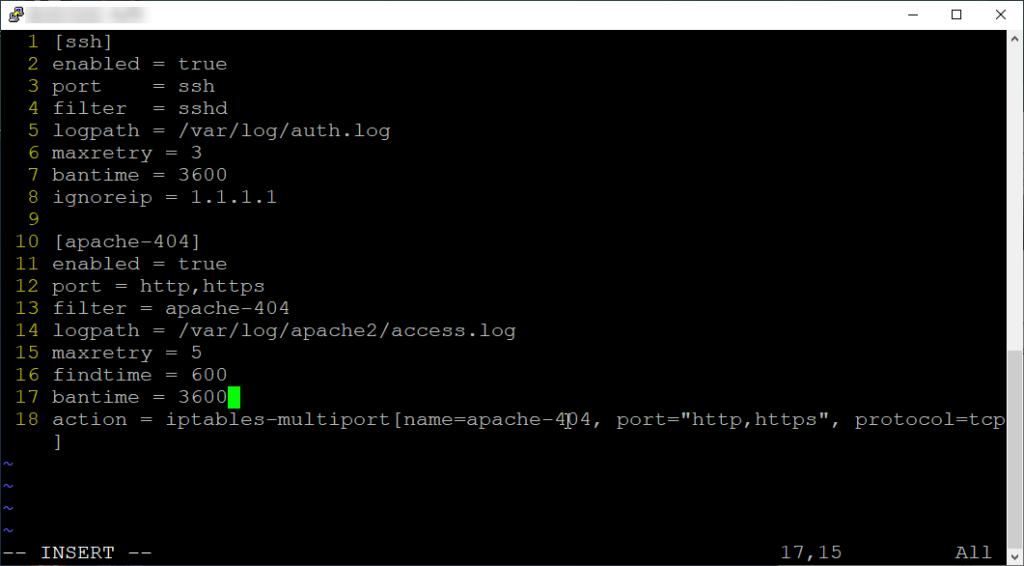
I’m not going to through everything listed here, but here the rundown. Of course you must enable the rule to have Fail2Ban apply the configuration. Provide port information, filter parameters and log path. The “findtime” here specifies the time window (in seconds) within which Fail2Ban will count occurrences of matching entries. The “action” parameter specifies the action to take when an IP address is banned. In this case, Fail2Ban will use the iptables-multiport action to block traffic from the banned IP addresses on both HTTP and HTTPS ports using the TCP protocol.
After adding this rule we will have to restart the Fail2Ban service again to have this rule take into effect.
sudo systemctl restart fail2ban
And voilà! There we have it, a rule that will effectively monitor Apache access logs for 404 errors and block IP addresses that generate excessive 404 errors. This helps protect your Apache web server from potential bots or malicious users trying to exploit non-existent URLs.
Needless to say, Fail2Ban is a valuable tool for improving the security posture of your system, reducing the risk of security breaches and protecting against a wide range of common security threats and attacks. It provides a flexible and customizable configuration framework that allows users to tailor the behavior and settings according to their specific requirements and security policies. By automating the detection and response to malicious activities, Fail2Ban helps maintain the integrity, availability, and confidentiality of your system and its resources.

