
Have you ever browsed a website, thinking it looks secure, only to realize later that beneath its polished exterior lie hidden vulnerabilities? While tools like Burp Suite help intercept and analyze traffic, tools like Nikto allow us to scan web servers proactively, finding weaknesses before attackers do. Today, we’ll dive into Nikto, a robust open-source web scanner that pinpoints misconfigurations, outdated software, and other critical vulnerabilities.
Nikto is an open-source, Perl-based web server scanner created for Penetration Testers, Security Researchers, and System Administrators. Developed and maintained by Chris Sullo, Nikto’s mission is simple: quickly detect web server vulnerabilities that can be exploited by attackers.
What makes Nikto stand out is its simplicity and speed, it lets you perform effective scans without a complicated setup. As a free and open-source tool, it benefits from regular updates and strong community support. It also integrates well with other popular security tools like Burp Suite, Metasploit, and OWASP ZAP, making it a valuable addition to any security professional’s toolkit.
⚠ Disclaimer ⚠
This post is for educational and research purposes only. Nikto is a powerful security tool designed for use in penetration testing, red teaming, and secure development workflows. It must only be used in authorized environments and with explicit permission.
Any unauthorized use of Nikto may violate computer crime laws.
I assume no responsibility for any misuse or consequences resulting from the use of this information. It is the sole responsibility of the reader to ensure compliance with all applicable laws, organizational policies, and ethical guidelines.
Installation
Getting started with Nikto is simple, especially if you’re using a penetration testing distribution like Kali Linux, which comes with Nikto pre-installed.
If you’re using another Linux distribution or want to install it manually, you can clone the official repository from GitHub:
git clone https://github.com/sullo/nikto.git
cd nikto/program
You can verify the version once in the nikto/program directory:
perl nikto.pl -Version
Now you can run the scanner with:
perl nikto.pl -h <target>
Feel free to add Nikto to your system’s PATH so you don’t have to run the script directly each time. This lets you call nikto from any location in your terminal. You can do this by following these steps:
cd ~/nikto/programchmod +x nikto.pl
sudo ln -s ~/nikto/program/nikto.pl /usr/local/bin/nikto
Now confirm the variable is in place by running:
nikto -Version
Scanning Basics
With Nikto installed, it’s time to put it to work. Let’s walk through a basic scan to get a feel for how it operates.
To scan a target web server, use the following command:
nikto -h <target>
Nikto will immediately begin analyzing the server and reporting back any issues it finds. You’ll see a live progress output in the terminal as it checks for outdated software, known vulnerabilities, default files, misconfigurations, and more.
Nikto includes several command-line options to tailor your scans. Here are a few commonly used ones:
-p – Scan a specific port (e.g., 443 for HTTPS)
-ssl – Force SSL (useful for https:// targets)
-o – Output results to a file
-Format – Specify output format (e.g., csv, txt, json, html)
-Tuning – Customize the types of tests performed (e.g., only test for known vulnerabilities)
Running a Scan Against a Target
For this walkthrough, we’ll scan a deliberately vulnerable web application (DVWA) running on 127.0.0.1, a safe and isolated lab setup intended for security testing.
To kick off the scan:
nikto -h http://127.0.0.1
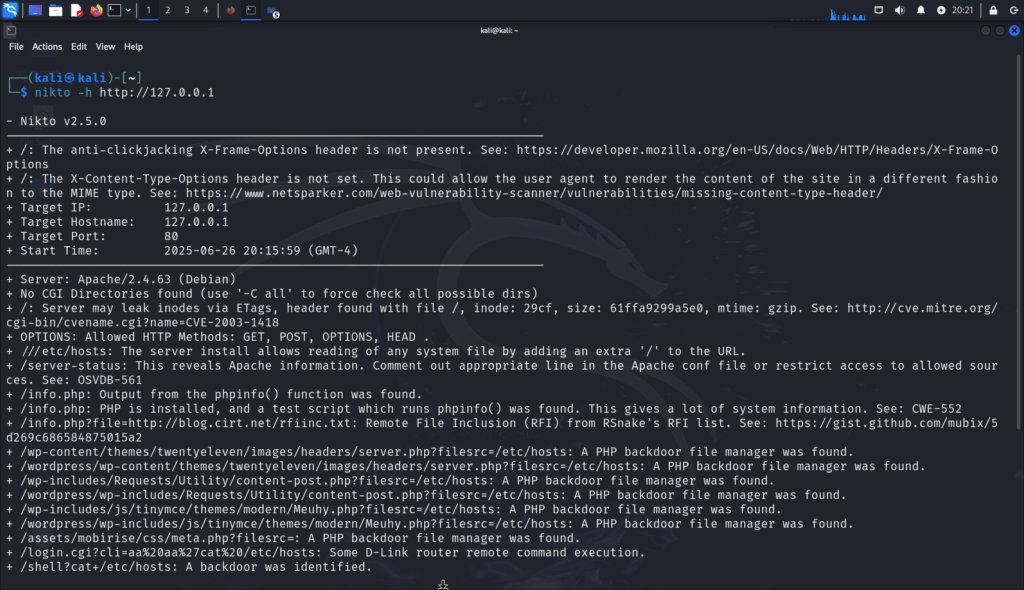
Here is the full output:
– Nikto v2.5.0
—————————————————————————
+ /: The anti-clickjacking X-Frame-Options header is not present. See: https://developer.mozilla.org/en-US/docs/Web/HTTP/Headers/X-Frame-Options
+ /: The X-Content-Type-Options header is not set. This could allow the user agent to render the content of the site in a different fashion to the MIME type. See: https://www.netsparker.com/web-vulnerability-scanner/vulnerabilities/missing-content-type-header/
+ Target IP: 127.0.0.1
+ Target Hostname: 127.0.0.1
+ Target Port: 80
+ Start Time: 2025-06-26 20:15:59 (GMT-4)
+ Server: Apache/2.4.63 (Debian)
+ No CGI Directories found (use '-C all' to force check all possible dirs)
+ /: Server may leak inodes via ETags, header found with file /, inode: 29cf, size: 61ffa9299a5e0, mtime: gzip. See: http://cve.mitre.org/cgi-bin/cvename.cgi?name=CVE-2003-1418
+ OPTIONS: Allowed HTTP Methods: GET, POST, OPTIONS, HEAD .
+ ///etc/hosts: The server install allows reading of any system file by adding an extra '/' to the URL.
+ /server-status: This reveals Apache information. Comment out appropriate line in the Apache conf file or restrict access to allowed sources. See: OSVDB-561
+ /info.php: Output from the phpinfo() function was found.
+ /info.php: PHP is installed, and a test script which runs phpinfo() was found. This gives a lot of system information. See: CWE-552
+ /info.php?file=http://blog.cirt.net/rfiinc.txt: Remote File Inclusion (RFI) from RSnake's RFI list. See: https://gist.github.com/mubix/5d269c686584875015a2
+ /wp-content/themes/twentyeleven/images/headers/server.php?filesrc=/etc/hosts: A PHP backdoor file manager was found.
+ /wordpress/wp-content/themes/twentyeleven/images/headers/server.php?filesrc=/etc/hosts: A PHP backdoor file manager was found.
+ /wp-includes/Requests/Utility/content-post.php?filesrc=/etc/hosts: A PHP backdoor file manager was found.
+ /wordpress/wp-includes/Requests/Utility/content-post.php?filesrc=/etc/hosts: A PHP backdoor file manager was found.
+ /wp-includes/js/tinymce/themes/modern/Meuhy.php?filesrc=/etc/hosts: A PHP backdoor file manager was found.
+ /wordpress/wp-includes/js/tinymce/themes/modern/Meuhy.php?filesrc=/etc/hosts: A PHP backdoor file manager was found.
+ /assets/mobirise/css/meta.php?filesrc=: A PHP backdoor file manager was found.
+ /login.cgi?cli=aa%20aa%27cat%20/etc/hosts: Some D-Link router remote command execution.
+ /shell?cat+/etc/hosts: A backdoor was identified.
+ 8074 requests: 0 error(s) and 18 item(s) reported on remote host
+ End Time: 2025-06-26 20:16:11 (GMT-4) (12 seconds)
—————————————————————————
1 host(s) tested
Analyzing the Output
Nikto returned several findings against our test environment. Let’s walk through some of the most notable ones and why they matter:
Missing Security Headers
/: The anti-clickjacking X-Frame-Options header is not present./: The X-Content-Type-Options header is not set.
These HTTP headers help protect users against client-side attacks:
X-Frame-Optionsprevents clickjacking, where an attacker loads your site in a hidden frame and tricks users into clicking buttons.X-Content-Type-Optionsprevents browsers from MIME-sniffing content into unintended formats, reducing XSS risk.
Fix: In production, these should always be configured.
Server Info Disclosure
Server: Apache/2.4.63 (Debian)/server-status: This reveals Apache information.
Revealing server software and version numbers makes it easier for attackers to match known exploits. Even worse, /server-status provides real-time info on Apache processes, a goldmine for attackers.
Fix: Disable /server-status or restrict access via Apache config.
Dangerous Files and Test Scripts
/info.php: Output from the phpinfo() function was found.
The phpinfo() function exposes details like loaded modules, file paths, and environment variables. This may seem harmless, but it’s incredibly useful for attackers during recon.
Fix: Remove or restrict access to test/dev scripts before deployment.
Remote File Inclusion (RFI)
/info.php?file=http://blog.cirt.net/rfiinc.txt
Nikto attempted to include an external file via a vulnerable parameter. This kind of Remote File Inclusion (RFI) vulnerability can allow remote code execution if successful.
Fix: Properly validate and sanitize user input to prevent inclusion attacks.
Exposed Backdoors
/wp-content/…/server.php?filesrc=/etc/hosts/wp-includes/…/Meuhy.php?filesrc=/etc/hosts
These appear to be PHP-based file managers or shells, often used by attackers to maintain control of a compromised system. Being able to read system files like /etc/hosts confirms elevated access.
If found in a real environment, this is a critical indicator of compromise (IoC).
Fix: Immediately isolate the system, investigate for full compromise, and remove any unauthorized files. Reinstall if integrity can’t be verified.
Command Execution Signatures
/shell?cat+/etc/hosts
/login.cgi?cli=aa%20aa%27cat%20/etc/hosts
These URLs suggest the server may respond to remote command injection attempts, allowing attackers to execute system commands.
In the real world, this would be a severe vulnerability requiring immediate investigation.
Fix: Disable dangerous endpoints, audit the codebase for unsanitized input handling, and restrict web server permissions. Treat this as a critical security issue.
Additional Features
Nikto is more than just a basic scanner, it offers a range of powerful options that make it valuable in real-world assessments. From handling HTTPS and scanning multiple targets to exporting results and integrating with other tools, let’s explore some of Nikto’s most useful features.
Scanning an HTTPS Website
If the target uses HTTPS, you’ll need to force Nikto to scan port 443 with SSL enabled:
nikto -h https://nmap.org -ssl
Without -ssl, Nikto may fail or return incomplete results when scanning HTTPS endpoints.
Scanning Multiple Targets from a File
To scan several domains or IPs at once, create a text file (e.g., targets.txt) with each entry on a new line:
Example targets.txt:
scanme.nmap.orgnmap.org192.168.1.10
Then run:
nikto -h targets.txt
This is great for automation during recon or internal audits.
Exporting Scan Results
Nikto supports several export formats for easy analysis and reporting.
nikto -h scanme.nmap.org -o results.txt
To specify a format:
nikto -h scanme.nmap.org -o results.csv -Format csv
Available formats: txt, csv, html, xml, nbe (Nessus), sql, and msf+ (Metasploit).
Sending Results to Metasploit
You can export your scan in a format compatible with Metasploit for easy importing:
nikto -h target.com -Format msf+
This streamlines your workflow when moving from recon to exploitation.
Specify Ports
Scan a specific port (useful for apps on non-standard ports):
nikto -h http://target.com -p 8080
Custom User-Agent
Use a custom User-Agent to evade basic detection:
nikto -h http://target.com -useragent "Mozilla/5.0 ..."
Conclusion
Nikto proves that a tool doesn’t have to be complex to be powerful. Its ability to quickly uncover outdated software, missing security headers, default files, and even dangerous backdoors makes it an essential part of any web reconnaissance or vulnerability assessment workflow.
While it doesn’t offer stealth or deep logic-based testing like more advanced scanners, Nikto excels at what it was built to do, identify known issues fast. It’s lightweight, easy to use, and highly effective when paired with other tools like Burp Suite, Metasploit, or Nmap.
Whether you’re running it against your own test environment or incorporating it into a larger assessment pipeline, Nikto is a tool every aspiring security professional should be familiar with.
Give it a try in your own lab and start getting comfortable with what real-world misconfigurations and exposures look like, before someone else does!